
PS4 HDMI Port Repair Symptoms Costs and Options

You switch on your PS4, the light settles to white, and the television responds with No Signal. You try the cable again, change the TV input, and perhaps hear the familiar startup sounds, but the screen stays black. It's a frustrating moment because the console seems to be working while the part you need most, the picture, has disappeared.
The fault may be a cable, TV input, or video-output setting. It may also be a damaged HDMI socket, a cracked solder connection, or another circuit-board problem. That distinction matters because a PS4 HDMI port isn't a simple external accessory. Replacement normally involves board-level micro-soldering, controlled heat, careful inspection, and testing.
This guide takes you from symptoms to safe checks, then explains what a professional repair involves and how to decide between repairing, replacing, or trading in an older console. Your games and saved data are normally separate from the HDMI connection, so an HDMI repair usually isn't the same as a system reset or storage repair.
Table of Contents
How the PS4 HDMI Port Works and Why It Fails - What can go wrong inside the doorway
Common Symptoms of a Faulty PS4 HDMI Port - What the symptoms tell you
Safe Diagnostic Steps Before Booking a Repair - Use a controlled elimination process - Why pad damage changes the repair
What Professional PS4 HDMI Port Repair Involves - The repair sequence - DIY tools versus a workshop setup
DIY Versus Professional Repair and What It Costs in the UK - The UK price benchmark
Introduction Why Your PS4 Shows No Signal
Your PS4 starts normally, yet the television shows No Signal. The console may respond to the controller or play its startup sound, while the screen remains blank. That combination points to the video path, but it does not identify one failed part by itself. The cable, television input, display settings, HDMI socket, or motherboard circuitry can all produce a similar result.
The HDMI connection carries both picture and sound. Its socket is mounted directly to the motherboard, so sideways pressure from a cable, moving the console while it is connected, or forcing a misaligned plug can strain the connector and its solder joints. The same principle applies to the original PS4, PS4 Slim, and PS4 Pro, although their cases and internal layouts differ.
A black screen alone does not prove that the port is broken. A loose socket, bent contact, or visible damage makes a physical repair more likely than a settings change. That distinction matters because the repair may involve board-level micro-soldering, not just fitting an external replacement part.
Begin with checks that cannot harm the board. Select the television's correct HDMI input, test another known-working cable, remove any switch or receiver from the connection, and try another display if available. A full power cycle and a Safe Mode display check can help separate an output-setting problem from hardware damage.
Stop if the cable feels loose or the socket moves. Twisting it or pushing tools into the opening can pull copper pads or traces away from the motherboard. A connector fault can then become a wider board repair, much like turning a loose door hinge into a damaged door frame.
If the basic checks change nothing, a technician should inspect the socket and the surrounding HDMI circuitry. The practical decision is whether that specialist work suits the console's age, condition, and current value. UK repair listings can help establish a benchmark, while the repair-or-replace choice should also account for saved data, accessories, and whether the console has other faults.
How the PS4 HDMI Port Works and Why It Fails
Think of the HDMI socket as a small doorway in the PS4's case. The cable plug enters through that doorway, while the pins inside act like individual contacts. They carry different parts of the connection, including video data, audio data, and the communication needed for the PS4 and television to agree on a usable signal.
The doorway is attached to the motherboard, not to a replaceable front panel. That makes physical force important. If the cable is yanked, bent sharply, or left under sideways pressure, the socket can move against its solder joints. A drop can have a similar effect, especially when a cable is still connected.
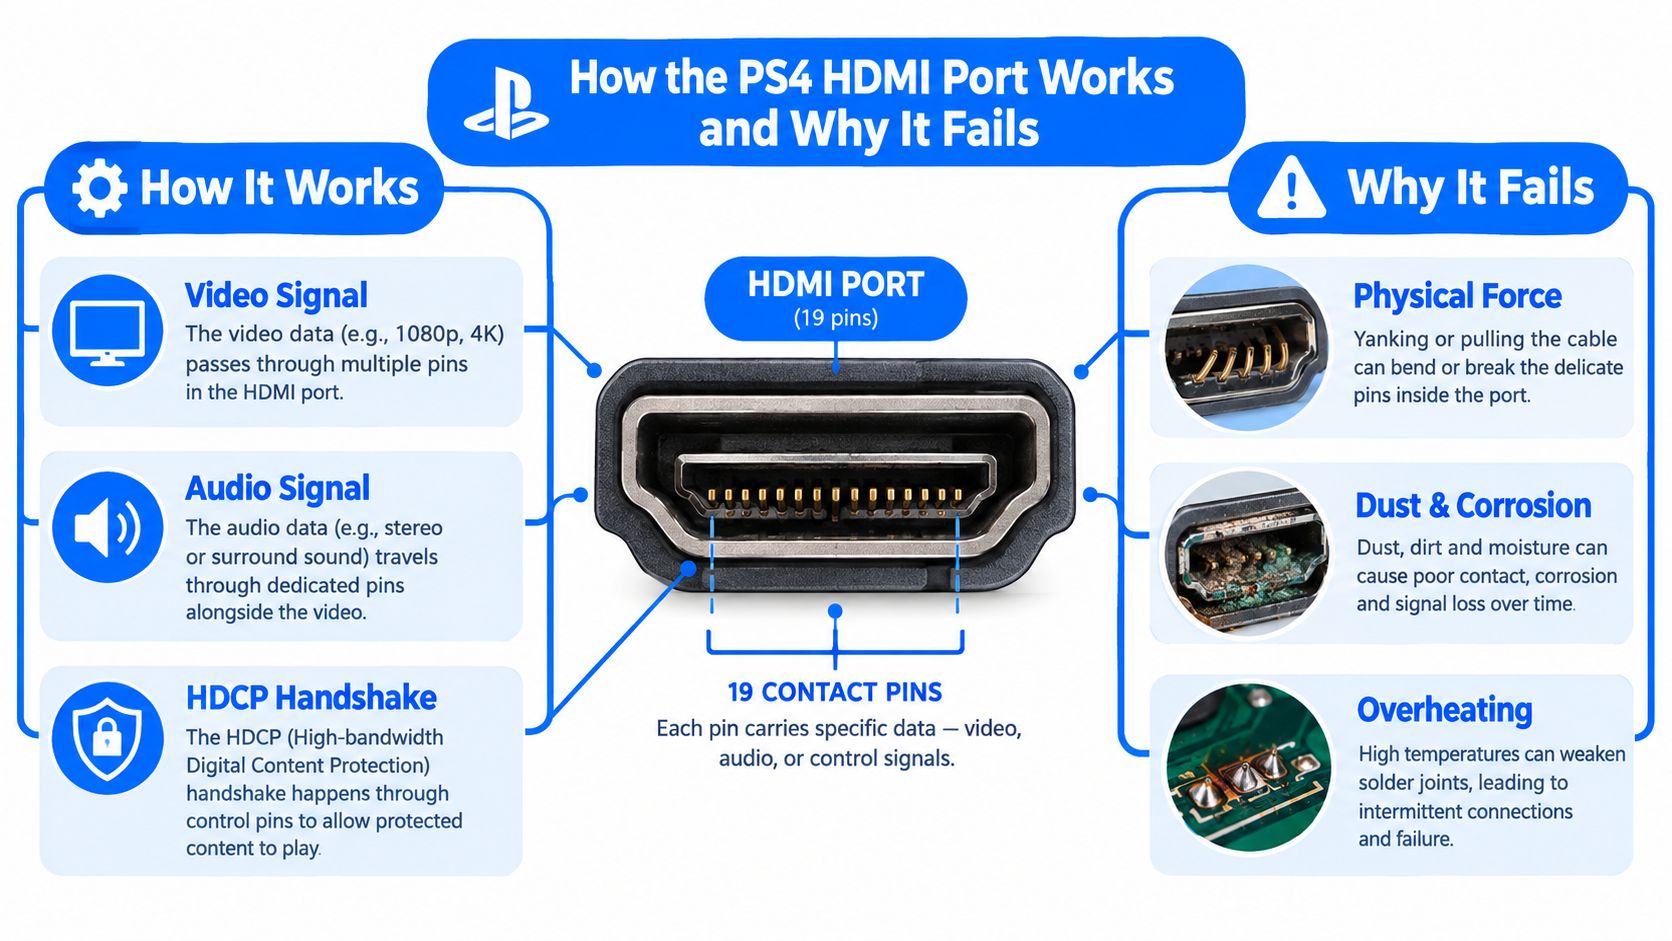
What can go wrong inside the doorway
Several faults can produce similar symptoms:
Bent or missing contacts: A plug can catch an internal contact, preventing part of the signal from reaching the cable.
Cracked solder joints: The socket may look intact while its connection to the motherboard has fractured.
Lifted pads or torn traces: Continued movement can pull the copper connection away from the circuit board.
Contamination: Dust or corrosion can interfere with contact, although visible physical damage should be treated more cautiously.
Damage elsewhere in the signal path: The connector may look fine while a nearby HDMI component has failed.
HDMI also carries a high-speed digital signal. UK electronics repair references describe HDMI 2.0 as an 18.0 Gbit/s transmission rate supporting 4K video, while HDMI 2.1 reaches 48.0 Gbit/s. This HDMI repair reference uses that distinction to explain why partial damage can affect demanding display modes before it causes a complete loss of picture.
That doesn't mean every PS4 display issue is a bandwidth problem. It means a connection can appear nearly functional while failing at a particular resolution, refresh setting, or audio configuration. A repair shop should therefore test more than a single picture on screen.
Before blaming the socket, remove obvious alternatives. Use a known-good cable, try another TV input, and connect directly to the television rather than through a switcher. If the same PS4 fails with different cables and displays, while the console continues to start normally, the physical HDMI path becomes a stronger suspect.
Common Symptoms of a Faulty PS4 HDMI Port
The clearest symptom is a PS4 that appears to start normally but produces no picture. The television may show No Signal, a black screen, or briefly detect the console before losing the connection. If changing the input and trying a known-good cable has no effect, the socket or its nearby circuitry needs closer inspection.
Intermittent output is another strong clue. The image may appear only when the cable is held at a particular angle, disappear when the console moves, or flicker during normal use. Don't treat that temporary picture as proof that the port is healthy. It often means the connection is making contact inconsistently.
Other signs include:
Sparkles or coloured distortion: Small areas of corrupted image can indicate a compromised high-speed connection.
Audio cutting out: Sound travels through the same HDMI link, so audio dropouts can accompany video instability.
Resolution fallback: The PS4 may display in one mode but fail when a more demanding setting is selected.
A loose plug fit: Excessive movement at the socket suggests mechanical wear or broken support connections.
Visible internal damage: A torch may reveal bent, displaced, or missing contacts.
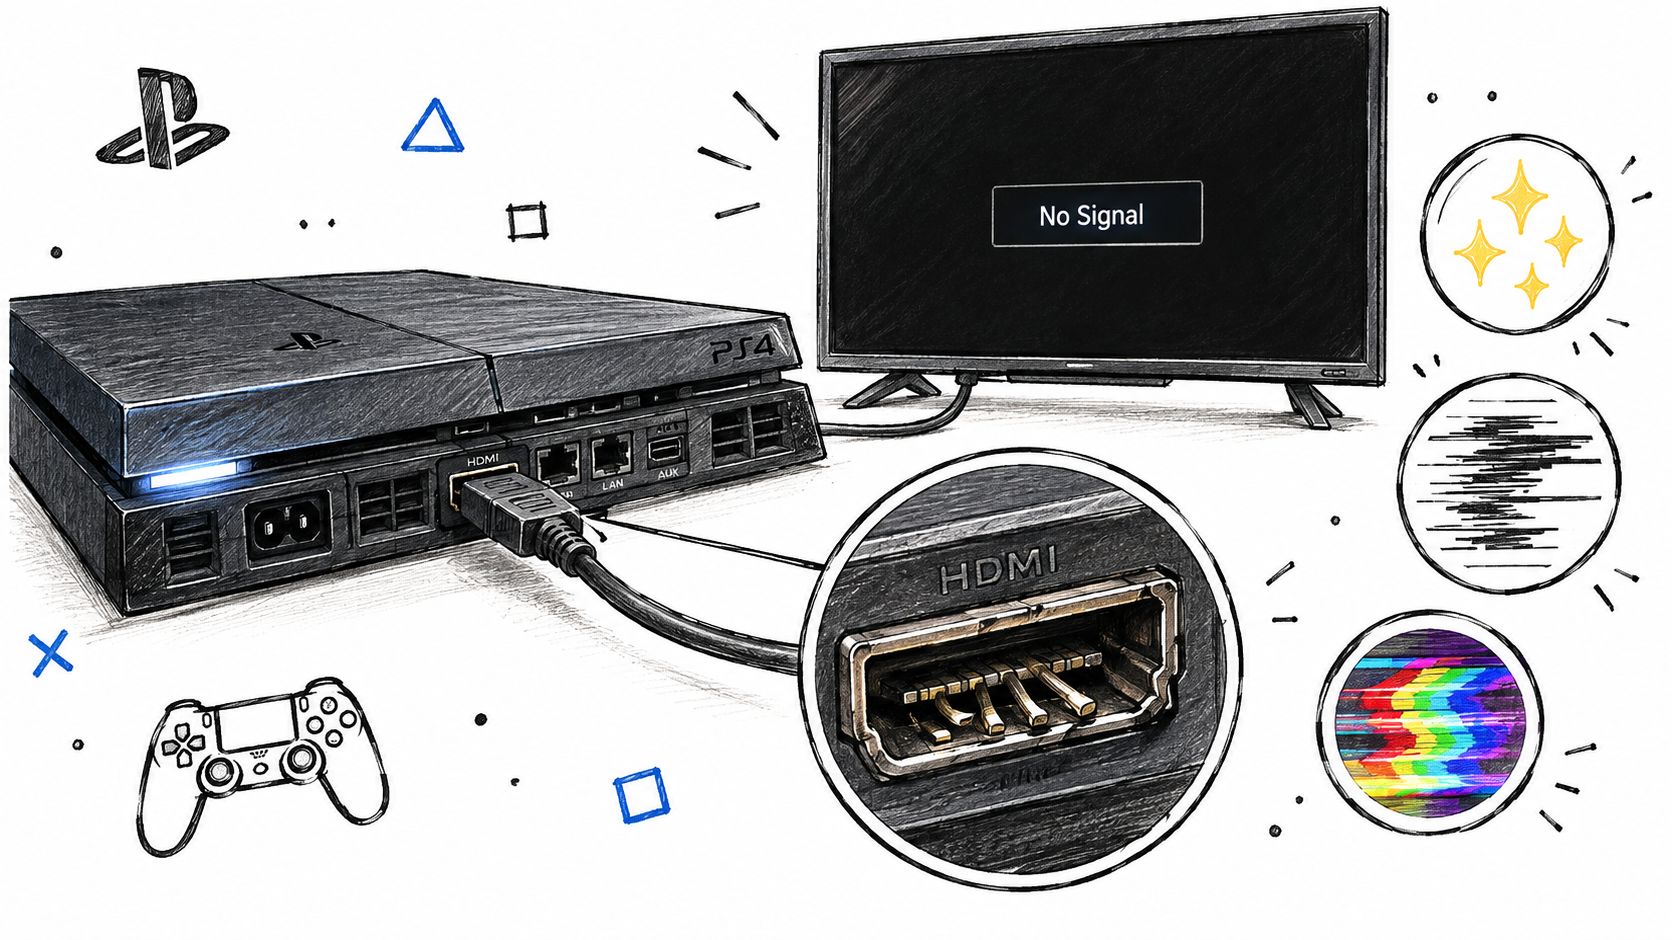
What the symptoms tell you
A white power light with normal startup sounds suggests that the PS4 is running even though its display connection isn't completing. That doesn't identify the exact failed component, but it makes the HDMI cable, socket, and signal circuitry more relevant than the console's storage.
A pulsing blue light that never settles is a different situation. It can indicate a broader startup fault, so a technician shouldn't assume that replacing the HDMI socket will solve every black-screen complaint.
Physical inspection often provides the most useful clue, but only if you look without touching the contacts.
If the screen cuts in and out when the cable moves, stop using that setup. Repeated movement can worsen a cracked joint or pull at the motherboard pads. The next step should be a controlled diagnostic process, not a tighter cable angle.
Here's a visual walkthrough of the kind of damaged connection owners commonly describe:
Safe Diagnostic Steps Before Booking a Repair
Good diagnosis starts by removing simple variables. You don't need to open the PS4 to establish whether the problem follows the console or stays with the cable, television, or selected input.
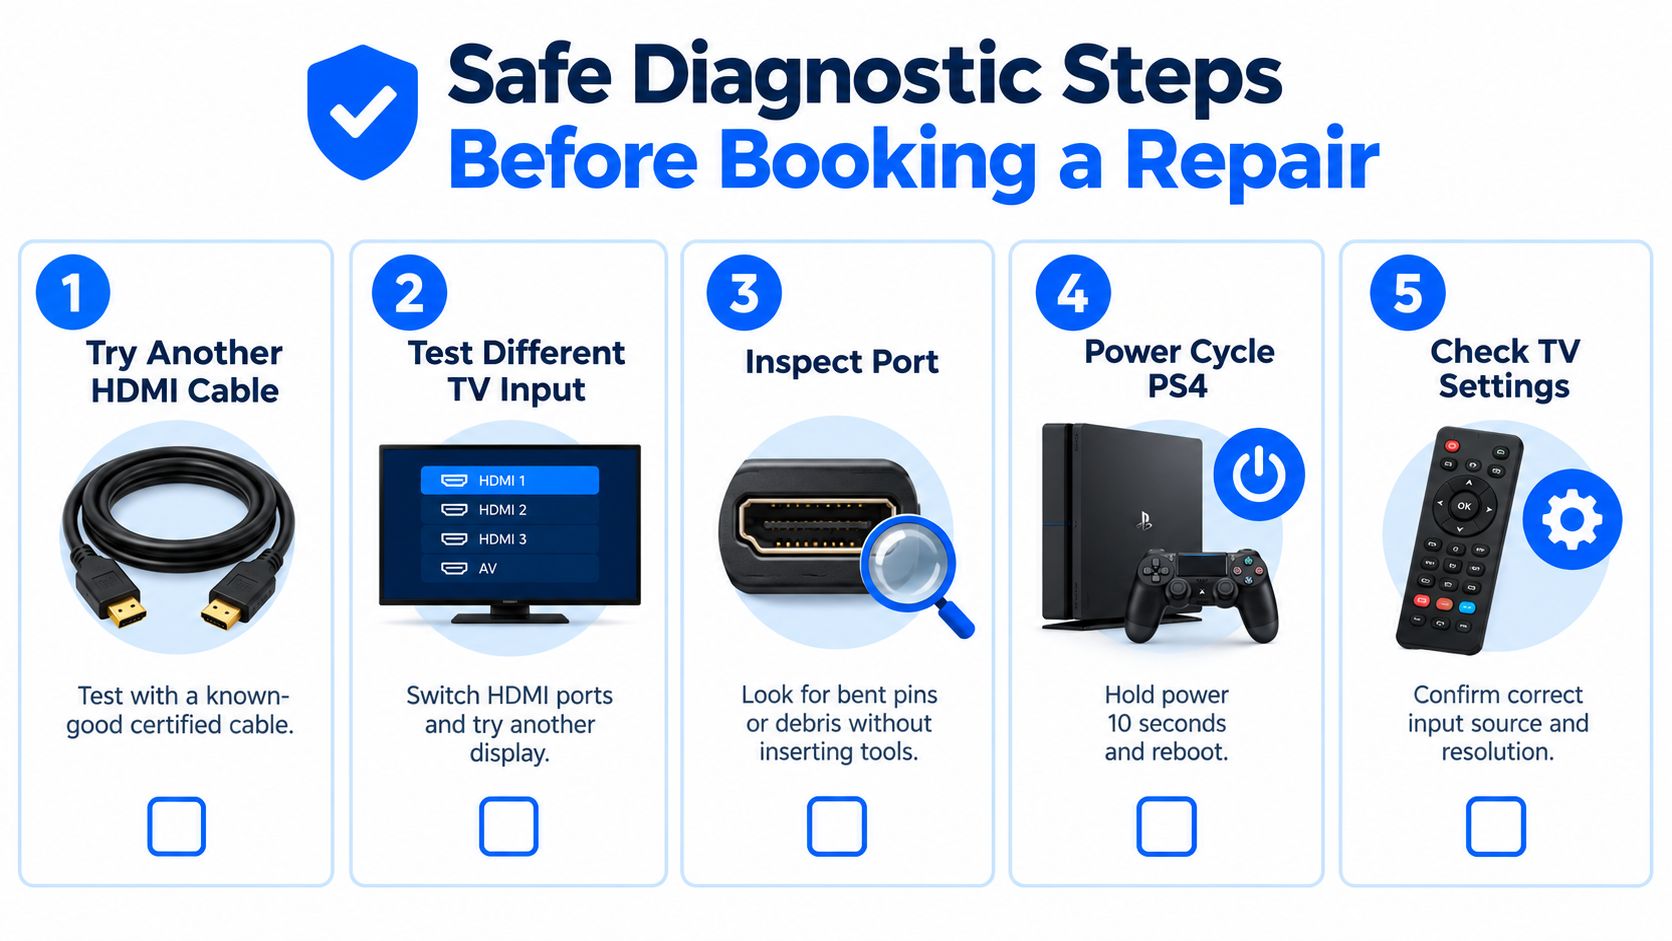
Use a controlled elimination process
Try another HDMI cable. Use a cable you know works with another device. Inspect both plugs for damage, insert them straight, and avoid forcing either end.
Change the television input. Select the input that physically matches the cable. If possible, test another HDMI socket on the TV and connect the PS4 directly, without an HDMI switch or receiver.
Try another display. A second television or monitor can separate a PS4 fault from a display compatibility issue. Keep the test simple, with one cable running directly from console to display.
Power-cycle the equipment. Shut the PS4 down fully, disconnect power, allow it to discharge, then reconnect it and test again. Restart the television as well so both devices can establish a fresh HDMI handshake.
Use Safe Mode carefully. With the PS4 fully off, hold the power button until the second beep, then connect a controller with a USB cable. The display settings option can help if the console is outputting a mode the television can't show.
A torch can help you look inside the socket. You're checking for a connector that has shifted, a contact that doesn't line up, or foreign material. Don't insert a needle, tweezers, screwdriver, cotton bud, or another tool. HDMI contacts are small, and a well-intentioned attempt to straighten one can break it or bridge contacts.
Why pad damage changes the repair
A port replacement begins with removing the damaged connector from the motherboard. The technician then checks whether the copper pads and traces remain attached. If they're intact, fitting the replacement is more contained. If force has lifted or torn them, the technician may need to rebuild connections before the new socket can work reliably.
That's why a technician can't always confirm the final repair scope from a photograph alone. A dropped console, visibly loose port, or socket that has been used while the cable is angled should be booked for inspection rather than repeatedly tested.
Stop troubleshooting when you've tried a reliable cable and display, Safe Mode produces no usable image, or the socket is physically loose. Continuing to operate a damaged connector rarely improves the diagnosis and can increase the mechanical stress on the board.
What Professional PS4 HDMI Port Repair Involves
Professional PS4 HDMI port repair is a sequence of controlled operations, not a matter of pulling out one socket and pushing in another. The technician first confirms that the symptom follows the console and examines the port, surrounding components, and board condition. That diagnosis matters because a clean-looking connector doesn't rule out a fault further along the HDMI signal path.
The repair sequence
The damaged connector is removed with controlled hot air. The aim is to soften the solder holding the port without overheating nearby components or tearing the board connections. The motherboard needs stable support while the old socket is lifted away.
Next, the technician cleans and inspects the contact area. They look for lifted pads, damaged traces, contamination, and solder that hasn't flowed correctly. Extra board work may be quoted after this inspection because the extent of damage can remain hidden beneath the original socket.
A model-matched replacement port is then aligned and soldered into place. Alignment matters mechanically as well as electrically. If the connector sits crooked, the cable can place pressure on the new joints every time it's inserted.
Finally, the repaired PS4 is bench-tested. The test should cover picture, audio, and the communication between the console and display, rather than stopping at “a picture appeared”. UK repair descriptions identify removal, pad and trace inspection, replacement soldering, and testing as part of the standard process for PS4, PS4 Slim, and PS4 Pro HDMI work. A UK repair process description also explains why additional pad or trace damage may be assessed separately.
DIY tools versus a workshop setup
A DIY attempt requires more than a soldering iron. HDMI sockets have large mechanical and ground connections that draw heat away, alongside delicate signal connections. A suitable hot-air rework station, microscope or strong magnification, flux, board support, temperature control, soldering equipment, cleaning materials, and a reliable replacement connector all matter.
A workshop also has the advantage of seeing the board after removal. That's the point where a technician can tell whether the repair is a straightforward socket replacement or a trace-reconstruction job.
For readers who want to understand the wider skill set, Steel City IT's guide to Xbox HDMI port repair provides a useful comparison because the same board-level principles apply across console HDMI repairs. Steel City IT is one Sheffield workshop that lists console hardware repair, board diagnostics, and micro-soldering among its services.
The result you want isn't merely a socket that looks new. It's a mechanically secure connector with electrically sound joints, followed by testing that reflects how you use the console.
DIY Versus Professional Repair and What It Costs in the UK
A DIY repair may look inexpensive because the HDMI socket is small. The cost includes suitable equipment, practice, replacement parts, and the risk of damaging the motherboard. Removing the connector without lifting its pads requires controlled heat and steady technique. If a pad or trace is torn, a simple replacement can become a more involved board repair.
Factor | DIY Attempt | Professional Micro-Soldering |
|---|---|---|
Cost | Lower only if you already own suitable equipment and can accept the risk | A quoted service fee covers specialist labour, parts, testing, and the workshop process |
Risk | Pad lift, torn traces, damaged nearby components, or poor alignment | Lower practical risk when the technician has appropriate board-level experience |
Turnaround | Depends on parts, tools, practice, and rework | Often organised around diagnosis, repair, and testing, with timing confirmed by the workshop |
Warranty | Usually no repair warranty | Ask what workmanship cover applies and what happens if the symptom returns |
Diagnosis | Easy to mistake a damaged port for an HDMI circuit fault | The board can be inspected before the final repair scope is agreed |
The UK price benchmark
Independent UK listings commonly place PS4 HDMI port replacement around £59 to £70. Examples include £59 for an original PS4 HDMI replacement in London, £59 to £69.99 for PS4 HDMI socket work in Leeds, £69 for PS4, Slim, and Pro repairs where extra board work is quoted separately, and £70 for an express mail-in service. The UK HDMI repair price listing also describes testing and, depending on the service, tracked return postage or rapid turnaround.
Use this range as a market benchmark, not as an automatic quotation. A connector with intact pads is a different job from one with torn traces or another HDMI fault. Ask whether diagnosis, the replacement port, testing, postage, and warranty are included.
The price also needs context. Broader PS4 repair menus list other faults from the mid-£20s upwards, while HDMI work commonly sits around £69 to £69.99. That makes it one of the higher-value board repairs on an older console. A wider PS4 repair menu shows why the repair-or-replace choice should not depend on the socket price alone.
A workshop can inspect the board after removing the port, much like checking the wiring behind a wall after taking off a damaged socket. That inspection reveals whether the job ends with connector replacement or requires trace reconstruction. For a plain-language explanation of the skills involved, read this guide to micro-soldering repair before opening the console. The practical question is whether your tools and experience can protect the motherboard if the connector does not release cleanly.
Should You Repair Replace or Trade In Your PS4
Use a short decision framework rather than guessing from the screen symptom.
Repair is sensible when the console starts normally, the HDMI fault is isolated, the rest of the hardware is in good condition, and you want to keep your existing games, accounts, and saved data. A board-level HDMI repair normally works around the storage drive, so it isn't the same as reinstalling the system.
Replacement or trade-in deserves consideration when the PS4 has several unrelated faults, substantial physical damage, or a repair quote that approaches what you consider a reasonable share of the console's current resale value. Check the console's condition thoroughly, including its drive, controller, power supply, cooling behaviour, and any previous repair history.
Ask the workshop four questions before approving work:
What failed: Is the problem definitely the HDMI port, or could it involve another HDMI component?
What's included: Does the quote cover the replacement part, board work, testing, and return delivery?
What protection applies: Is there a workmanship warranty, and what exclusions should you understand?
How long will it take: What turnaround should you expect after diagnosis?
Owners in Sheffield can arrange local assessment through PS4 repair near me. A few-day turnaround may be typical for a straightforward fault, but complexity and parts availability can change the schedule, so confirm it before booking.
Once repaired, support the HDMI plug instead of pulling the cable, keep the console still while connected, and avoid tight bends near the socket. Those small habits reduce strain on the replacement connector and help protect the work you've paid for.
If your PS4 powers on but won't display an image, Steel City IT can assess the HDMI port and related console hardware, then explain whether repair, further board work, or replacement makes practical sense. Visit Steel City IT to arrange a Sheffield assessment and discuss your PS4 HDMI port repair options.
