
How to Clone Hard Drive

The usual job lands on the bench with an ageing laptop, a new SSD still in its packaging, and a Windows installation that takes ages to start. The owner wants the old system, applications, settings, and personal files moved across without reinstalling everything. That's exactly where hard-drive cloning earns its keep, but only when the source drive is healthy enough to read safely.
A clone isn't a repair. It's a sector-level copy of the source, including its boot partitions, file structures, encryption metadata, and faults. UK forensic guidance explains that raw sector or block imaging can capture deleted, hidden, and system data without mounting the source volume, while independent cloning guidance describes the same approach as preserving the boot sectors and file structures needed for a genuine 1:1 copy (UK data-forensics guidance on raw imaging). The important question isn't how to clone hard drive content. It's whether cloning is still the right job.
Table of Contents
Why People Clone Drives and What Can Go Wrong - The failures that catch people out
Pre-Clone Checks Every User Should Run First - Build a safe pre-flight
Cloning Step by Step on Windows, macOS, and Linux - Windows with Macrium Reflect - Linux with Clonezilla - macOS with Disk Utility
Handling SSDs, UEFI, MBR, and BitLocker Properly - Match the firmware to the partition map - Treat BitLocker as a migration concern
Verifying the Clone and Troubleshooting Common Failures - Three failures worth diagnosing first
When Cloning Is the Wrong Job and a Professional Should Take Over
Why People Clone Drives and What Can Go Wrong
Most cloning jobs begin with a sensible upgrade. An old mechanical HDD is slow, noisy, or too small, and an SSD offers a practical route to a faster machine without starting Windows from scratch. The wider UK storage market provides useful context. One 2025 UK study estimated the data-storage market at USD 9,574.6 million in 2024, rising to USD 10,944.7 million in 2025 and projected to reach USD 42,593.4 million by 2035, with the study reporting 13.2% growth from 2020 to 2024 and a 14.5% CAGR from 2025 to 2035 (UK data storage market research). Storage replacement and migration are routine parts of that expanding cycle.
The trouble starts when the source disk has already begun to fail. A clone copies what the drive can deliver. It won't rebuild damaged files, correct a broken boot configuration, or turn unreadable sectors into healthy data. If the original contains bad blocks, corrupt partitions, or a damaged boot store, the target may reproduce those problems faithfully.
The failures that catch people out
A few bench failures appear repeatedly:
The source won't shrink: A larger HDD may contain partitions or immovable metadata that prevent a straightforward move to a smaller SSD, even when the visible used space appears low.
The clone won't boot: The data may be present, but the EFI System Partition or Windows Boot Configuration Data may not be usable on the new drive.
BitLocker asks for recovery: A cloned encrypted volume can trigger a recovery-key prompt after the hardware identity or boot arrangement changes.
The target mirrors the damage: A failing drive can pass read errors, corrupted files, and unstable partition information into an otherwise perfect SSD.
Practical rule: A successful copy of sectors isn't automatically a successful migration. The new machine must also recognise the right partition layout, boot mode, encryption state, and drive order.
Cloning is valuable because it preserves a working environment. It's also unforgiving because it preserves the source's condition. That distinction should shape every decision that follows.
Pre-Clone Checks Every User Should Run First
Treat preparation as part of the clone, not as paperwork before it. The safest workflow protects the files first, checks the health of the source, confirms compatibility, and only then starts the sector transfer.
Build a safe pre-flight
Back up important files elsewhere. Copy documents, photographs, project folders, browser exports, and anything irreplaceable to an external drive or cloud storage. Don't use another partition on the same physical disk as the only backup, because that disk can fail as one unit.
Check SMART health. CrystalDiskInfo on Windows and on Linux can expose warning signs. Reallocated sectors and pending sectors deserve particular caution. If those values are non-zero, or if the drive is disappearing intermittently, don't treat the clone as a routine upgrade.
Confirm usable capacity. The destination needs enough usable space for the source layout and data. A smaller SSD can work only when the cloning tool can safely resize the source partitions and the data fits within the destination's layout.
Inspect the connection. Use a known-good SATA-to-USB adapter, enclosure, dock, or direct SATA connection. A faulty enclosure can cause disconnects, while a slower USB path can turn an ordinary migration into a long wait.
Check the file system. On Windows, run and allow repairs to complete. On Linux, boot from a live USB and run on an unmounted file system. On macOS, start Recovery and run First Aid on each relevant volume.
Check firmware visibility. Enter the BIOS or UEFI setup and confirm that both drives appear. Record which disk is the source and which is the target before opening the cloning software.
Prepare encryption recovery. If BitLocker is active, locate and record the recovery key, then suspend protection before cloning. Don't assume your normal Windows password will solve a recovery prompt.
A healthy source should remain stable during a read-heavy operation. If it clicks, freezes, drops out of the operating system, or reports rapidly worsening health, stop before repeated attempts turn a recoverable problem into a more difficult one.
A file backup protects the contents. A clone protects the system layout. You need to know which one you're relying on before you erase the target.
Choosing the Right Cloning Tool for the Job
No single application is ideal for every migration. The right choice depends on the operating system, whether the source is encrypted, the target's size and interface, and how comfortable you are working outside a familiar desktop window.
Clonezilla is the strongest free option when you need a sector-aware workflow from a Linux live USB and you're comfortable reading prompts carefully. It's powerful and flexible, but its text-led interface makes source and destination identification especially important. It's a good fit for technicians and confident users who want control rather than hand-holding.
Macrium Reflect Home is generally easier for a Windows HDD-to-SSD migration. Its graphical workflow makes partition selection and resizing clearer, and its rescue-media tools give you a route into an offline environment when the installed Windows copy is unstable. It still requires careful checking, particularly where encrypted volumes and UEFI boot files are concerned.
Acronis True Image makes sense when the new drive includes a manufacturer-specific licence or migration utility. Samsung, Crucial, and Western Digital may bundle versions intended for their own drives, which can be convenient when the target belongs to that ecosystem. The trade-off is that vendor tools can be less useful when the target brand changes or when you need recovery-oriented control over a failing source.
For macOS, Carbon Copy Cloner is more migration-focused than Disk Utility for bootable APFS work and scheduled snapshots. Apple's own Disk Utility remains useful for straightforward restores, but newer Macs add security and startup considerations that a simple drag-and-copy approach doesn't address.
Tool | Best for | Cost | Handles BitLocker | Interface |
|---|---|---|---|---|
Clonezilla | Free, sector-level work for experienced users | Free | Requires careful encryption handling and the recovery key | Text-based live environment |
Macrium Reflect Home | Windows migrations with partition management | Paid edition | Supports Windows workflows, but encryption still needs preparation | Graphical |
Acronis True Image | Vendor-supported migrations and broader imaging | Paid or bundled edition | Depends on the encryption state and migration setup | Graphical |
Manufacturer tools | Moving to a matching Samsung, Crucial, or WD drive | Often bundled with the drive | Varies by product and configuration | Graphical |
Carbon Copy Cloner | macOS cloning and scheduled snapshots | Paid | FileVault requires deliberate preparation | Graphical |
A tool that advertises SSD, M.2, NVMe, and Windows support isn't necessarily managing your boot configuration correctly. Treat compatibility claims as a starting point, then verify the actual source layout and encryption state.
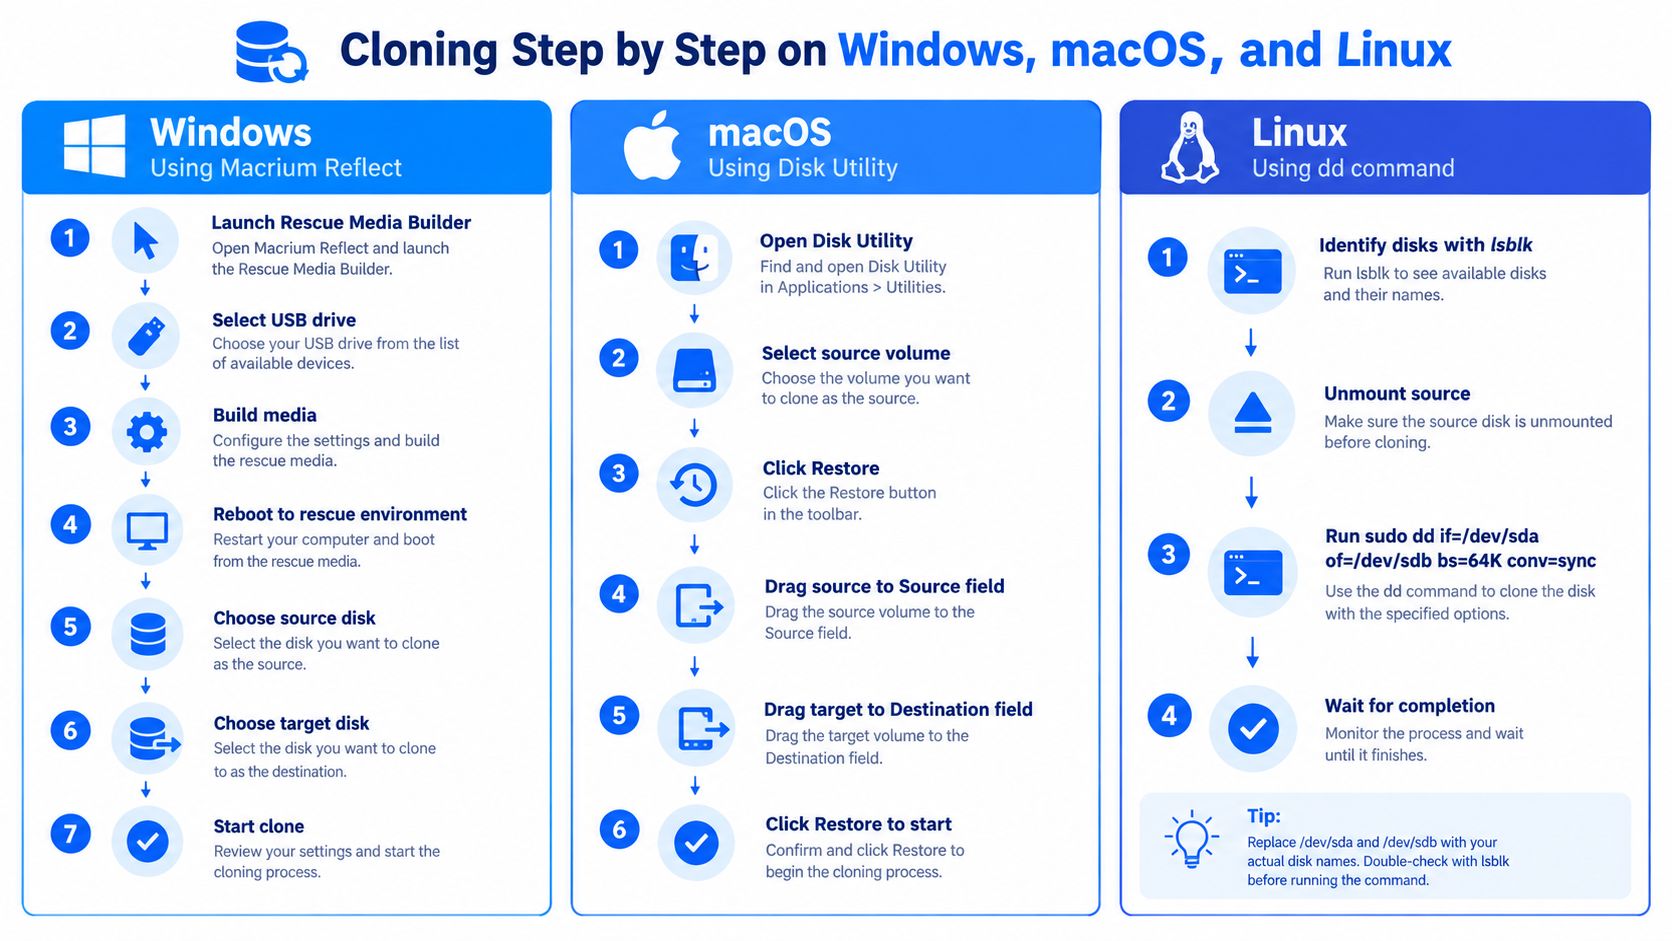
Cloning Step by Step on Windows, macOS, and Linux
A wrong destination selection can erase the only usable copy of a customer's files. Connect the new drive, then identify both disks by model and capacity before opening the cloning tool. Drive letters can change between Windows sessions, so they are not enough for a safe selection.
Windows with Macrium Reflect
For a Windows migration, build rescue media before starting the clone. Open Macrium Reflect, run Rescue Media Builder, select the USB drive, and create the bootable media. Restart from that USB so Windows is not writing changing system files while the transfer runs.
In the rescue environment:
Select the source disk by model and check its partition layout.
Choose Clone this disk….
Select the new SSD as the destination.
Copy the System or EFI System Partition, MSR, and main Windows partition. Add recovery partitions when the tool offers them and the destination has room.
Open the destination partition properties and resize the main partition if needed.
Select Next, review the summary, and choose Fix EFI boot entries when available.
Select Finish, then approve the warning that the destination will be overwritten.
Stop at the final warning if the model shown does not match the SSD you installed. That prompt is the last opportunity to prevent an accidental erase.
BitLocker changes the preparation. Have the recovery key available, and check whether the source is suspended before the transfer. A clone can complete while the encrypted installation still needs recovery-key confirmation on the first boot.
Linux with Clonezilla
Write Clonezilla to a bootable USB and start the computer from it. Set the language and keyboard, choose Start Clonezilla, then select device-device, disk-to-disk, and Beginner mode for a direct drive transfer.
Clonezilla asks you to identify the source and destination. Match model names and capacities rather than relying on position in the list. Use the arrow keys to select the source first, then choose the new disk as the target and confirm with Enter. Read each warning, accept file-system and boot-sector prompts that fit the job, and approve the final overwrite prompt only after checking both disks again.
The live environment prevents mounted system volumes from changing during the copy. If the source is encrypted, intermittently disconnecting, or producing read errors, ordinary disk-to-disk cloning may increase stress on the drive. At that point, a recovery-focused image or professional assessment is safer than repeated DIY attempts.
macOS with Disk Utility
Start a Mac migration from macOS Recovery. Open Disk Utility, choose View > Show All Devices, and select the parent source drive, not just one visible volume. Select the destination device, choose Restore, and set the source as the restore source. On APFS systems, use Restore rather than the older Restore from Time Machine route.
Disk Utility shows a final source-to-destination confirmation before writing. Read it carefully because selecting the wrong parent device can erase another disk. Macs with additional startup security may also require permission changes before the clone can boot independently.
Every platform should identify the source and destination explicitly and warn that the destination will be erased. If the software offers no such warning, it may be creating an image or backup instead of a direct clone.
Handling SSDs, UEFI, MBR, and BitLocker Properly
A drive can contain all the expected files and still fail to boot. The cause is usually a mismatch between the physical copy and the firmware arrangement that tells the computer how to start it.
SSDs benefit from a cloning tool that understands modern partition layouts and maintains sensible alignment. Moving from an HDD to an SSD isn't just a matter of copying visible folders. The target needs a compatible partition table, correct offsets, and a boot structure the firmware can read. NVMe upgrades add another layer because the new device may be detected differently from the original SATA disk.
Match the firmware to the partition map
UEFI systems normally boot through an EFI System Partition and use GPT partitioning. Older legacy BIOS systems typically use MBR and a different boot path. A clone created for UEFI won't automatically become a working legacy-BIOS installation, and changing the target machine can expose that mismatch immediately.
Source mode | Target mode | Outcome | Fix needed |
|---|---|---|---|
UEFI with GPT | UEFI with GPT | Usually compatible if the EFI partition and boot files copy correctly | Check boot order and repair EFI entries if needed |
Legacy BIOS with MBR | Legacy BIOS with MBR | Usually compatible when the system partition and boot sector are intact | Confirm the active system partition |
UEFI with GPT | Legacy BIOS with MBR | Won't boot without conversion and configuration | Convert the partition scheme and rebuild boot files |
Legacy BIOS with MBR | UEFI with GPT | Won't boot without conversion and configuration | Convert the disk and create a valid EFI boot path |
For a plain-language explanation of the firmware distinction, Steel City IT's guide to UEFI versus BIOS is useful before you begin. If your goal is an SSD replacement rather than a laboratory clone, a practical guide to how to replace your hard drive can also help you plan the physical swap and post-clone checks.
Treat BitLocker as a migration concern
BitLocker changes what “successful” means. The sectors may copy correctly, but the new hardware identity, boot records, or firmware order can cause Windows to request the recovery key. Keep that key accessible, suspend BitLocker before cloning, and resume protection only after the new drive has booted and Windows reports the expected security state.
A clone of an encrypted disk isn't automatically a migration. If the source volume won't decrypt cleanly, or Windows is already showing recovery problems, don't keep repeating the same clone. Protect the recovery key and reassess whether the job has become data recovery.
Verifying the Clone and Troubleshooting Common Failures
Don't declare victory when the progress bar reaches the end. The old disk can hide problems because the computer may still be booting from it, even when you believe the new drive is selected.
Start with a simple comparison. Check the used space reported on the source and destination, then open several folders and files that matter. Run a file-system check against the new drive, shut the computer down fully, disconnect the old drive, and boot cold from the clone. The machine must start without the original attached.
Three failures worth diagnosing first
It boots only when the old disk remains connected. The new disk may lack a usable EFI partition or BCD entry. Boot from a Windows installer USB, open the recovery command prompt, assign the new EFI partition a drive letter, and use with the correct Windows and system-partition letters. Drive letters in recovery aren't guaranteed to match normal Windows.
The destination shows the wrong capacity. An intermediate partition layout can leave unallocated space unused or place a recovery partition where it blocks expansion. Inspect the disk in Disk Management, Disk Utility, or , then correct the layout before considering another clone. Don't delete a partition until you know whether it contains recovery or boot information.
macOS displays a prohibited sign. The clone may conflict with T2 security settings, Secure Boot policy, or the Mac's permitted startup sources. In Recovery, open Startup Security Utility and enable Allow booting from external or internal storage where the hardware offers that option. For broader guidance when the destination SSD itself is suspect, Steel City IT's information on SSD data recovery explains why health checks matter before further writes.
Disconnecting the original drive is the only reliable test that the new drive, rather than the old one, is carrying the boot process.
When Cloning Is the Wrong Job and a Professional Should Take Over
Stop cloning when the source drive clicks, repeatedly disconnects, freezes under load, or shows worsening reallocated or pending sectors. Those symptoms point to mechanical, controller, or surface problems. A consumer cloning tool may keep retrying difficult reads, placing extra stress on a drive that's already struggling.
Encryption can also change the decision. If BitLocker or FileVault won't open cleanly, repeated attempts can leave you with fewer safe options. A machine that boot-loops after migration despite sensible partition and boot repairs also needs diagnosis, not another blind copy.
Professional recovery work uses controlled handling, sector-level imaging, and, where necessary, hardware imagers or donor components. The objective is to capture the readable data with as little additional stress as possible, then work from the image or clone rather than repeatedly operating on the original. Steel City IT's data migration service is relevant when the drive is healthy but the migration needs controlled testing, while a failing source may need recovery first.
The decision rule is blunt: healthy drive plus a clear upgrade goal means clone it yourself. Clicking, SMART deterioration, intermittent access, encryption trouble, or important data on an unstable disk means stop, preserve the original, and have it imaged professionally before migration.
Steel City IT can assess the source drive, perform sector-level data recovery where needed, and migrate a healthy system to a new SSD without treating a failing disk like a routine clone. If you're in Sheffield or nearby and want the drive checked before anything is overwritten, visit Steel City IT to arrange a diagnostic or storage migration.
