
HDMI Port Repair: Practical Fixes and When to Call a Pro

You've switched the TV input, tried restarting the console, and still get the same black screen or “no signal” message. The cable looks fine, the console powers on, and your first instinct is probably that the HDMI port has failed.
Don't pay for a port replacement yet. HDMI faults are often misdiagnosed because the same symptom can come from the cable, display settings, socket, solder joints, protection components, or the motherboard. A short diagnostic sequence will tell you which path you're on and help you avoid turning a simple cable problem into an unnecessary repair.
Table of Contents
Quick Checks That Will Save You a Repair Bill - Reset the HDMI handshake - Record what changes
Symptoms That Point to Different HDMI Faults - Look without forcing anything
Safe DIY Fixes You Can Try at Home - What you can safely try - Reseat the connection correctly
When the Fault Is in the Board, Not the Port - Signs of board-level damage - What professional rework involves
Repair or Replace, How to Decide - When replacement makes more sense
Sheffield Repair Options at Steel City IT - Questions to ask before authorising work
Your Next Step and What to Do Today - Start with the outside of the device - Prepare the device properly - Make the decision based on evidence
Quick Checks That Will Save You a Repair Bill
Start with the cheapest possible explanation. Connect the suspect console, laptop, or computer to the TV or monitor using a known-good HDMI cable. Don't rely on a cable that has only worked intermittently. Swap it directly, without an adapter, splitter, capture card, or AV receiver in the chain.
Next, move the cable to a different HDMI input on the display. Select that input manually with the remote rather than relying on automatic detection. If the picture returns, the console may be fine and the original input may be the problem.
Now test the same cable and display with another source, such as a different console, laptop, or set-top box. This tells you whether the fault follows the cable, stays with the screen, or remains attached to the original device. For Xbox owners, this Xbox HDMI troubleshooting guide covers the same basic isolation process.
Reset the HDMI handshake
Turn off both devices. Unplug the console and display from the mains for 30 seconds, then reconnect them and power up the display before the source device. HDMI devices exchange information about resolution, refresh rate, audio, and copy protection. A failed handshake can look exactly like a broken port.
If you can access the console menu, choose a supported resolution and refresh rate. A display that can't accept the selected output may show no picture even though the HDMI hardware is working. On a PC, check the active display in Windows settings and test a lower resolution before blaming the socket.
Record what changes
Note whether the picture appears after changing the cable, input, display, or power state. If nothing changes and the device still boots normally, you've narrowed the fault to the source device. That's useful information for a technician and a strong reason not to authorise a connector swap without diagnosis.
Symptoms That Point to Different HDMI Faults
The symptom matters more than the message on the screen. “No signal” only describes the result. It doesn't identify the failed component.
A signal that cuts in and out when the cable moves usually points to a poor connection. The cable may have an internal break, or its plug may no longer fit squarely. If the socket itself rocks, sits at an angle, or only works when the cable is held in a particular position, mechanical damage is more likely.
A stable picture covered with sparkles, coloured dots, flickering lines, or sudden dropouts deserves more caution. Those symptoms can come from a damaged cable, a marginal connector contact, or circuitry on the board that handles and protects the high-speed HDMI signal. Don't keep wiggling the cable to make it work. Repeated movement can worsen a cracked joint.
Symptom | Most Likely Cause | Likely Location |
|---|---|---|
No picture with one cable, normal picture with another | Cable failure | HDMI cable |
Picture cuts out when the cable moves | Poor plug fit or loose socket | Cable or connector joints |
Socket is visibly bent or pushed inside the case | Mechanical impact | HDMI socket |
Socket wobbles when the cable is inserted | Cracked solder or broken anchors | PCB mounting joints |
TV detects a source but shows no image | Bent contact, damaged data line, or video circuitry | Socket or motherboard |
Audio works but video is absent | Fault on one or more video data paths | Port, filter, protection device, or board |
Video works but audio is missing | Audio handshake or related signal fault | Settings, cable, or board |
Coloured lines or sparkles appear | Signal integrity problem | Cable, connector, or HDMI circuitry |
No signal after a drop, while the console still boots | Physical port or board damage | Socket, solder pads, or traces |
Look without forcing anything
Switch the device off and use a torch to inspect the socket. Bent, missing, recessed, or visibly contaminated contacts are useful clues. A connector that looks normal can still have cracked solder underneath, so visual inspection can't clear the board completely.
The strongest diagnosis comes from combining observations. If another cable and display make no difference, the device boots and produces normal sounds, and the connector feels loose, the socket or its mounting joints deserve inspection. If the socket is firm but there's still no image, the technician needs to test the board rather than automatically replacing the connector.
Practical rule: A no-signal message is a symptom, not a diagnosis. Pay for HDMI port repair only after the cable, display, settings, and physical connection have been separated as possible causes.
Safe DIY Fixes You Can Try at Home
There's a safe boundary for home troubleshooting. Stay on the outside of the device, change one variable at a time, and stop as soon as the fault points towards physical damage.
What you can safely try
Swap the cable: Use a cable known to work with another device. Insert it straight, without twisting or levering it against the socket.
Change the display input: Test another HDMI input and, if possible, another television or monitor.
Power cycle both ends: Shut down the source and display, unplug them, reconnect them, and let the display initialise before turning on the source.
Check settings: Use the console's recovery or safe mode if the output resolution may be unsupported. On a PC, test a basic display mode before changing advanced refresh-rate settings.
Update software: A firmware or graphics-driver update can resolve compatibility problems, but it won't repair a bent pin or broken solder joint.
Clean gently: With the device powered down and unplugged, use a short burst of compressed air to loosen dust. If compacted fluff remains, use a non-conductive plastic pick or wooden toothpick very carefully around the opening.
Never spray liquid cleaner into the port. Don't use a needle, pin, screwdriver, or metal tweezers. Metal can bridge contacts, scratch the connector, or create a short when the device is powered.
Reseat the connection correctly
A cable should slide into the socket with modest, even pressure. If it stops halfway, don't force it. Remove it, inspect the plug for damage, and check the port again with a torch. A connector that needs to be held down, lifted, or angled to produce a picture is warning you that the contact or soldering may be failing.
This is also the point where many owners make the problem more expensive. Pushing a loose socket back into place, bending pins into alignment, or applying solder with a general-purpose iron can lift copper pads from the circuit board. Once those pads detach, a connector replacement alone may no longer solve the fault.
Wait for the device to cool and power it down fully before any cleaning. If the port is visibly loose, take a clear photograph, keep the cable out of it, and hand the device to someone equipped for board-level work.
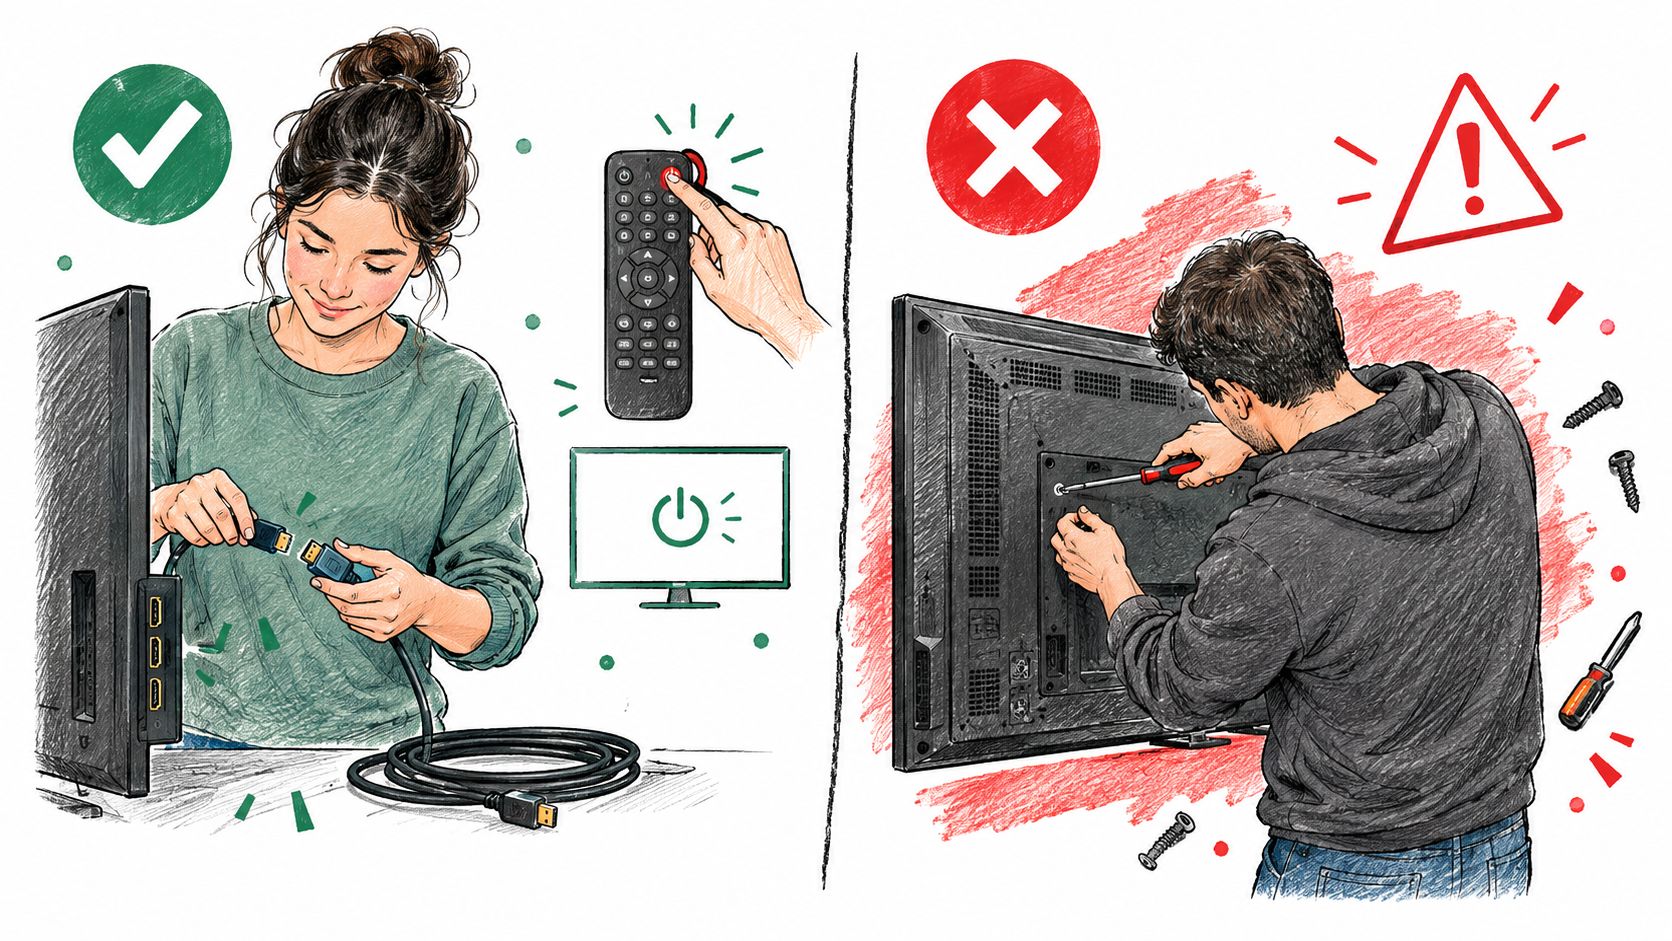
Use this video as a visual reminder of the difference between a correct cable connection and risky device disassembly. It isn't a substitute for diagnosis, and opening a console can create additional damage or affect warranty coverage.
When the Fault Is in the Board, Not the Port
A port can look like the obvious failure while the actual damage sits underneath it. HDMI connectors have signal contacts, ground connections, and mechanical anchor points soldered directly to the PCB. A forceful cable pull can crack those joints or tear the copper pads away from the board.
Signs of board-level damage
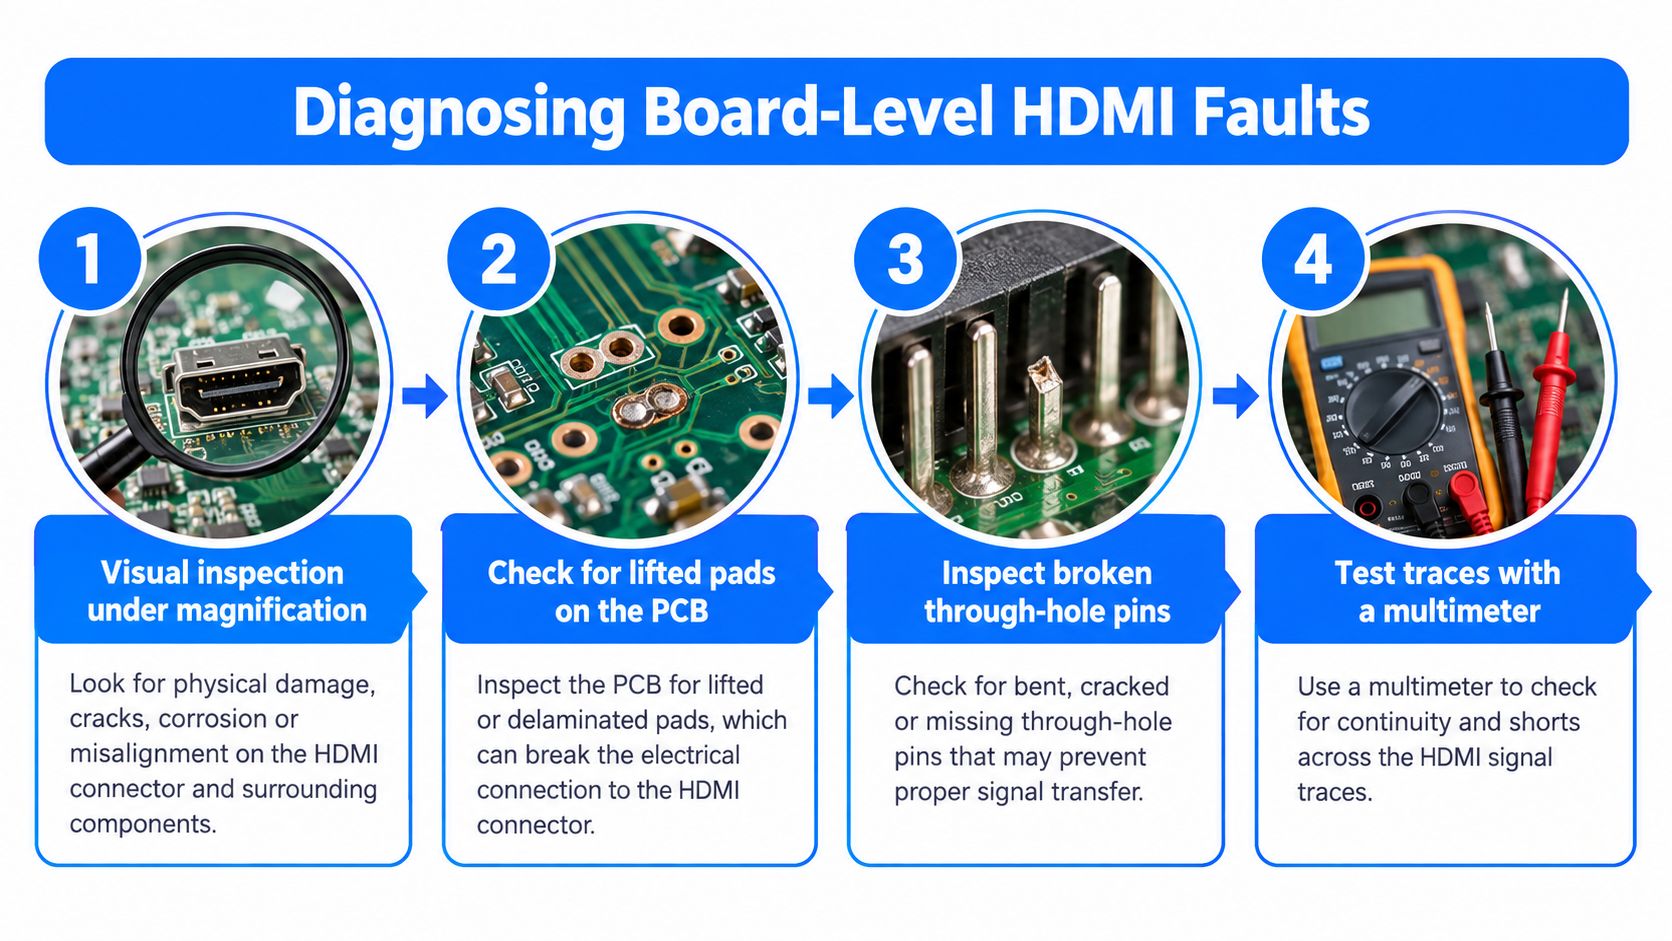
A microscope reveals damage that a phone torch won't. A technician looks for lifted pads, fractured solder around the mounting tabs, broken through-hole anchors, torn traces, and contamination beneath the connector. A socket may appear intact from the outside while one or more signal contacts have lost their connection to the board.
Continuity testing helps separate a connector fault from a trace fault. The technician checks the relevant paths from the HDMI contacts into the surrounding circuitry, then checks for unexpected shorts to ground. If a pad has lifted, the correct repair may involve rebuilding the connection with fine wire rather than just fitting a new socket.
What professional rework involves
A proper repair starts with controlled removal of the damaged connector. Hot air must be applied carefully so the socket releases without disturbing nearby filters, protection devices, retimers, or other small components. The board then needs flux-assisted solder-wick cleanup and microscope inspection before a replacement is fitted.
If the copper has lifted, the technician may reconstruct the pad or install a fine jumper wire to restore the electrical path. The new connector must match the board mechanically, sit squarely, and have secure signal and ground joints. A rushed socket swap can leave the console working at one display mode while failing at another.
The HDMI source circuitry uses a 4.8 to 5.3 volt supply on the +5 V pin, requires at least 55 mA source capability, and includes overcurrent protection of no more than 0.5 A, according to STMicroelectronics HDMI application guidance. Those rails and related signal paths matter when a new socket has been fitted but the display remains blank.
A dock adapter won't bypass a damaged HDMI path, and forcing the original connector only transfers more stress into the PCB. Once the board is involved, stop testing with pressure and seek a technician who carries out microscope inspection, continuity checks, controlled rework, and full display validation. For Sheffield owners, micro-soldering repair is the relevant type of service, not a basic accessory replacement.
Repair or Replace, How to Decide
A damaged HDMI socket rarely means the whole console or computer has reached the end of its useful life. It usually means one small, exposed interface has taken mechanical stress. If the device otherwise boots, runs games, stores your data, and performs normally, repair is the sensible first option.
The environmental argument is also practical. UK government estimates put electrical and electronic waste at approximately 23.9 kilograms per person in 2019, and earlier UK data found that only 42% of generated waste electrical and electronic equipment was treated and reported through the formal system in 2017. The same government programme estimated that almost one-quarter of electronic products discarded by consumers could have been suitable for reuse. These figures come from the UK Waste Prevention Programme, which doesn't record HDMI faults separately, but the repair-first principle applies directly to a localised connector failure.
Factor | Repair | Replace |
|---|---|---|
Fault scope | Suits a damaged socket, solder joint, pad, or trace | Makes sense when several major systems have failed |
Data | Keeps the existing device and its local data in place | May require transfer, account access, or recovery work |
Warranty | May preserve an existing claim if handled through the responsible route | A replacement device has its own warranty terms |
Cost decision | Compare diagnosis, parts, labour, testing, and warranty | Include the purchase price, accessories, setup, and data migration |
Environmental impact | Keeps the current hardware in service | Sends a potentially repairable device towards reuse or waste routes |
Future reliability | Depends on board condition and repair quality | Provides a different board, but not necessarily a better value |
Best fit | One contained fault on an otherwise healthy device | Water damage, multiple failed components, or an uneconomic board |
When replacement makes more sense
Replacement can be reasonable if the device already has several unrelated faults, suffered extensive liquid damage, or has a motherboard problem beyond the HDMI circuit. It may also be the right choice when the diagnostic shows that repair would consume too much of the device's remaining value.
Don't make that decision from a black screen alone. A University of Surrey study examined 10,678 UK Repair Café records and found that around 50% of brought-in items were successfully repaired, while another 28% were considered potentially repairable. At a municipal recycling centre, only approximately 2% to 2.5% of observed devices were judged suitable for reuse, as reported in the University of Surrey's repair research. HDMI wasn't isolated as its own category, but the contrast supports a proper assessment before disposal.
Ask for the total price, not just the connector price. Include diagnosis, parts quality, board damage, final testing, warranty, shipping, and any risk to the device. Also ask whether the repair returns your original console, because that matters for saved data, installed games, settings, and accessories.
Sheffield Repair Options at Steel City IT
For a Sheffield owner, the sensible local route is a workshop that can diagnose the whole HDMI path rather than assuming every black screen needs a socket. Bring the affected console, computer, or laptop and explain exactly what happened. You don't need to bring every HDMI cable you own, but note which cables, displays, and inputs you've already tested.
Give the technician a short fault history:
Device model: State whether it's a PS5, PS4, Xbox Series console, Xbox One, Nintendo Switch, desktop PC, or laptop.
Fault behaviour: Say whether the screen is always blank, intermittent, flickering, or affected by cable movement.
Power state: Confirm whether the console boots, produces audio, runs its fans, or shuts down.
Physical history: Mention drops, cable pulls, moving the device while connected, or visible damage.
Previous work: Disclose any earlier port replacement, cleaning, liquid exposure, or attempted repair.
A proper intake should establish whether the fault is reproducible and whether the device has a second problem. The workshop may test a known-good cable and display, inspect the connector, check the board under magnification, and determine whether the repair is a socket replacement or more involved microsoldering. Don't approve additional work until the technician explains what was found and what the revised scope means.
Steel City IT is a Sheffield workshop in Frecheville that provides diagnostics, computer and console repair, logic-board work, and micro-soldering for complex faults. Its published service information also identifies coverage across areas including Birley, Hackenthorpe, and Woodhouse, so customers can confirm the current drop-off arrangements directly before travelling.
Questions to ask before authorising work
Ask whether the quoted work covers only the connector or includes pad and trace repair if damage is found. Confirm how the repaired device will be tested, including more than one cable or display where appropriate. Ask what warranty applies to the work, whether data remains on the original device, and when you'll be contacted if the diagnosis changes.
Turnaround depends on the fault, parts, and workshop queue. A straightforward port replacement can be quicker than a repair involving missing pads, damaged traces, or HDMI protection components. A clear diagnostic report is more valuable than a fast promise that doesn't explain what failed.
For related board work in the area, soldering repair near Sheffield is the type of service to look for. A general electronics counter may be able to replace a cable or clean a socket, but board-level HDMI damage needs appropriate inspection and rework equipment.
Your Next Step and What to Do Today
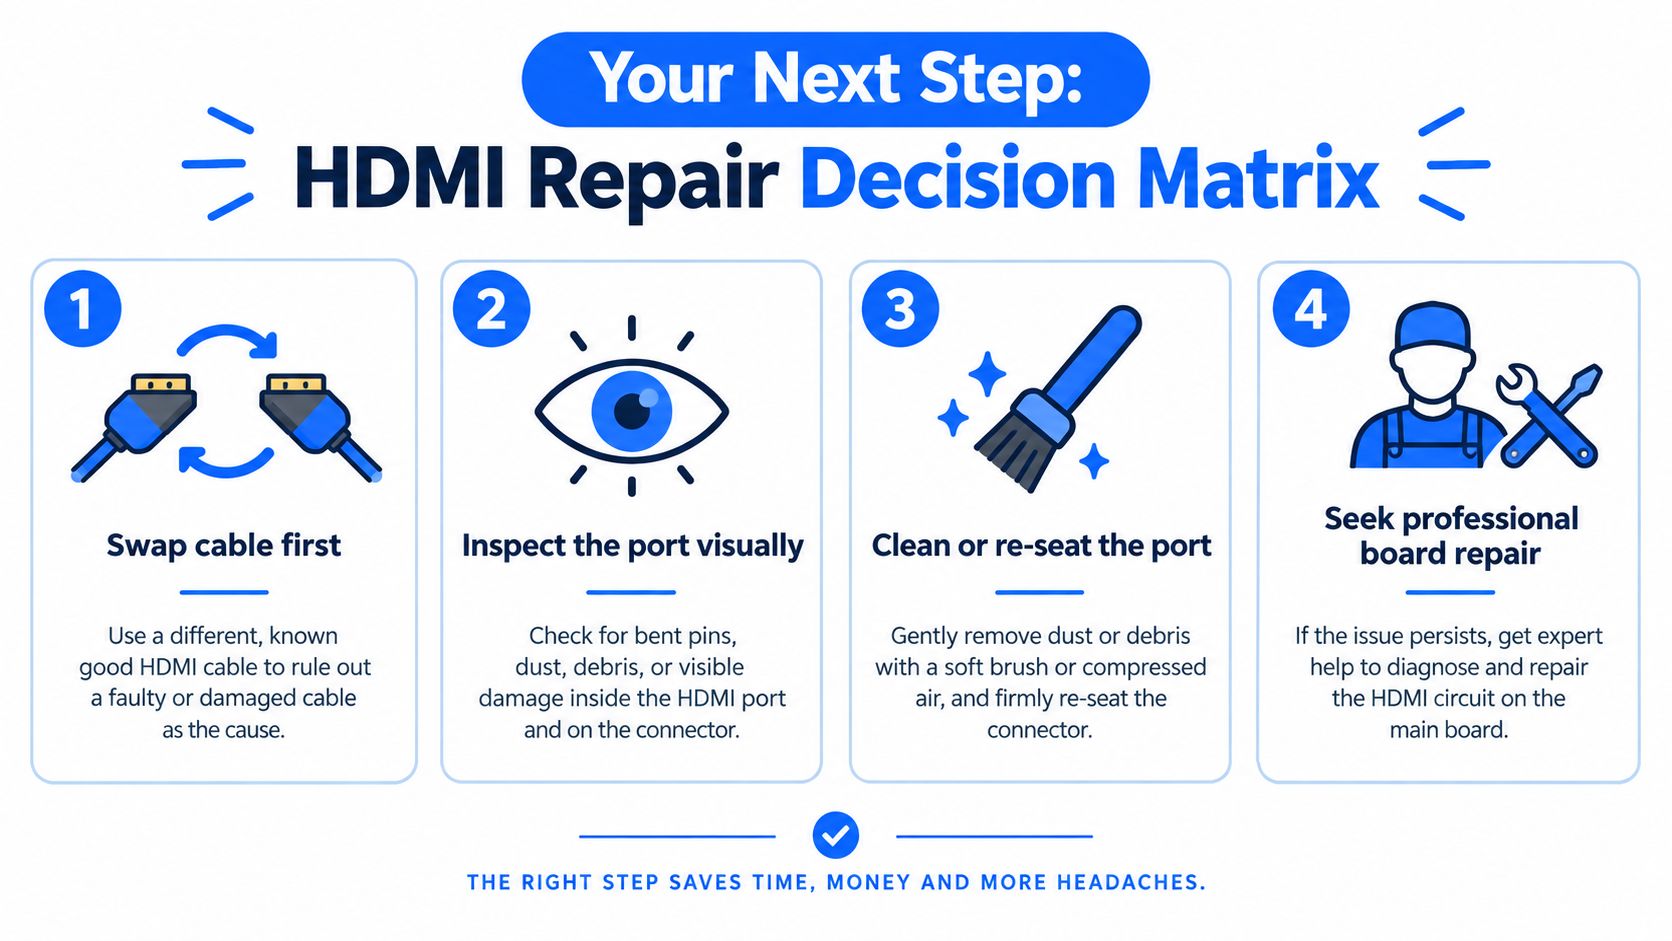
Use this decision order and don't skip ahead to a port swap.
Start with the outside of the device
Swap the cable first. Use a known-good HDMI cable and insert it straight. If the picture returns, replace the faulty cable and stop there.
Test the display path. Try another HDMI input, another screen if available, and a full power cycle on both devices.
Check the output settings. Use recovery or safe mode to select a compatible resolution if the console may be outputting a mode the display can't show.
Inspect the socket. Look for bent contacts, debris, a tilted connector, or a socket that moves inside the case.
Clean only when appropriate. Power down, unplug, use compressed air, and remove loose fluff with a non-conductive tool. Don't scrape contacts.
Stop at physical damage. Don't straighten pins, push the socket back, add solder, or keep holding the cable at an angle.
Book board-level diagnosis. If the device boots but still has no image after the external checks, the fault may be in the socket, joints, traces, protection circuitry, or video-output board.
Prepare the device properly
Before taking it in, photograph the outside of the HDMI socket and write down the exact model. Record whether the fault began after a drop, a cable pull, a move, a storm, liquid exposure, or no obvious event. Include the results of your cable, display, input, and settings tests.
Remove discs, USB accessories, external hard drives, and personal items. Pack the device so it can't slide around, using padding that supports the case without pressing on the HDMI connector. If you're sending it rather than dropping it off, protect the original packaging or use a sturdy box with space around the device.
The key question for the technician is not just, “Can you replace the HDMI port?” It's, “Can you confirm whether the cable, socket, soldering, or board is responsible?” That wording encourages a diagnosis rather than a routine part swap. If you want broader practical guidance on preparing technology for troubleshooting and support, you can browse SupportGPT-1 resources before booking any repair.
Make the decision based on evidence
Repair is the right move when the device is otherwise healthy and the fault is confined to the HDMI path. Replacement deserves consideration when diagnosis finds multiple major failures, severe liquid damage, or a board repair that no longer makes financial sense. Don't throw away a working console because one connector stopped carrying a picture.
For Sheffield customers, contact the workshop before travelling and ask about the current diagnostic process, drop-off arrangements, expected turnaround, and warranty terms. Give the technician the model and fault history, then wait for the diagnosis before agreeing to a connector replacement.
If your console or computer powers on but won't display an image, Steel City IT can assess the HDMI socket, solder joints, and related board circuitry rather than guessing at the fault. Visit Steel City IT to arrange a Sheffield diagnostic and take the next step towards a properly tested HDMI port repair.
