
MacBook Screen Flickering: How to Diagnose and Fix It

Your MacBook is a couple of years old, the warranty has just run out, and the screen has started to blink. It might be a single black flash when you switch apps, or a fast shimmer that only shows up at night with the brightness down to 40 per cent. Either way, the first instinct is to assume the panel is dying and a large bill is coming.
That instinct is wrong more often than it's right. MacBook screen flickering is a symptom, and the same visual complaint can come from a display setting, a tired cable, a fluorescent tube across the room, pulse-width modulation dimming, or a failing panel. Sorting the cause takes an hour of tests, most of them free, and it's the difference between a settings change and a screen replacement. Here's the order I'd work through before anyone puts a screwdriver near the case.
Table of Contents
Which Flicker Symptoms Point to Which Cause
A flicker pattern helps narrow the fault, but it cannot confirm a failed part on its own. Match what you see to the closest row, then use it to choose a focused test.
Symptom | Likely cause to investigate | First check |
|---|---|---|
Flicker only on the built-in screen, external monitor stable | Panel, display cable or backlight power path | Compare with an external monitor and note the lid angle |
Flicker on both screens | macOS, graphics, power delivery or logic board | Boot into Safe Mode and check for software causes |
Flicker at startup or in macOS Recovery | Hardware or firmware path | Run Apple Diagnostics and record a video |
Flicker only below full brightness | PWM dimming or display electronics | Test at 100 per cent brightness |
Flicker changes with lid angle | Display cable or hinge flex | Hold the lid at several angles and record each result |
Flicker near fluorescent lights, microwaves or radios | Electrical interference | Move the Mac to another room and retest |
Flicker only on one charger | Adapter or cable | Swap to a known-good Apple-certified cable and retest |
These patterns can overlap. A backlight fault may resemble a dimming artefact, while a cable affected by hinge movement can flicker only at certain lid angles. Treat each row as a lead, not a diagnosis.
Apple's guidance on MacBook display faults treats flicker as a symptom that needs diagnosis, rather than proof of one specific fault. Check display settings and run built-in diagnostics before considering internal inspection. Refresh-rate settings, the display cable and the panel electronics are all possible causes, but the symptom alone does not distinguish them.
If the flicker appears on both the built-in screen and an external display, a logic-board fault is one possibility to investigate. A MacBook logic board repair process differs from replacing a screen, so identifying which path the evidence supports matters before approving work. Carry the closest-matching symptom into the next tests, and avoid choosing a repair based on flicker alone.
How to Reproduce and Isolate the Fault
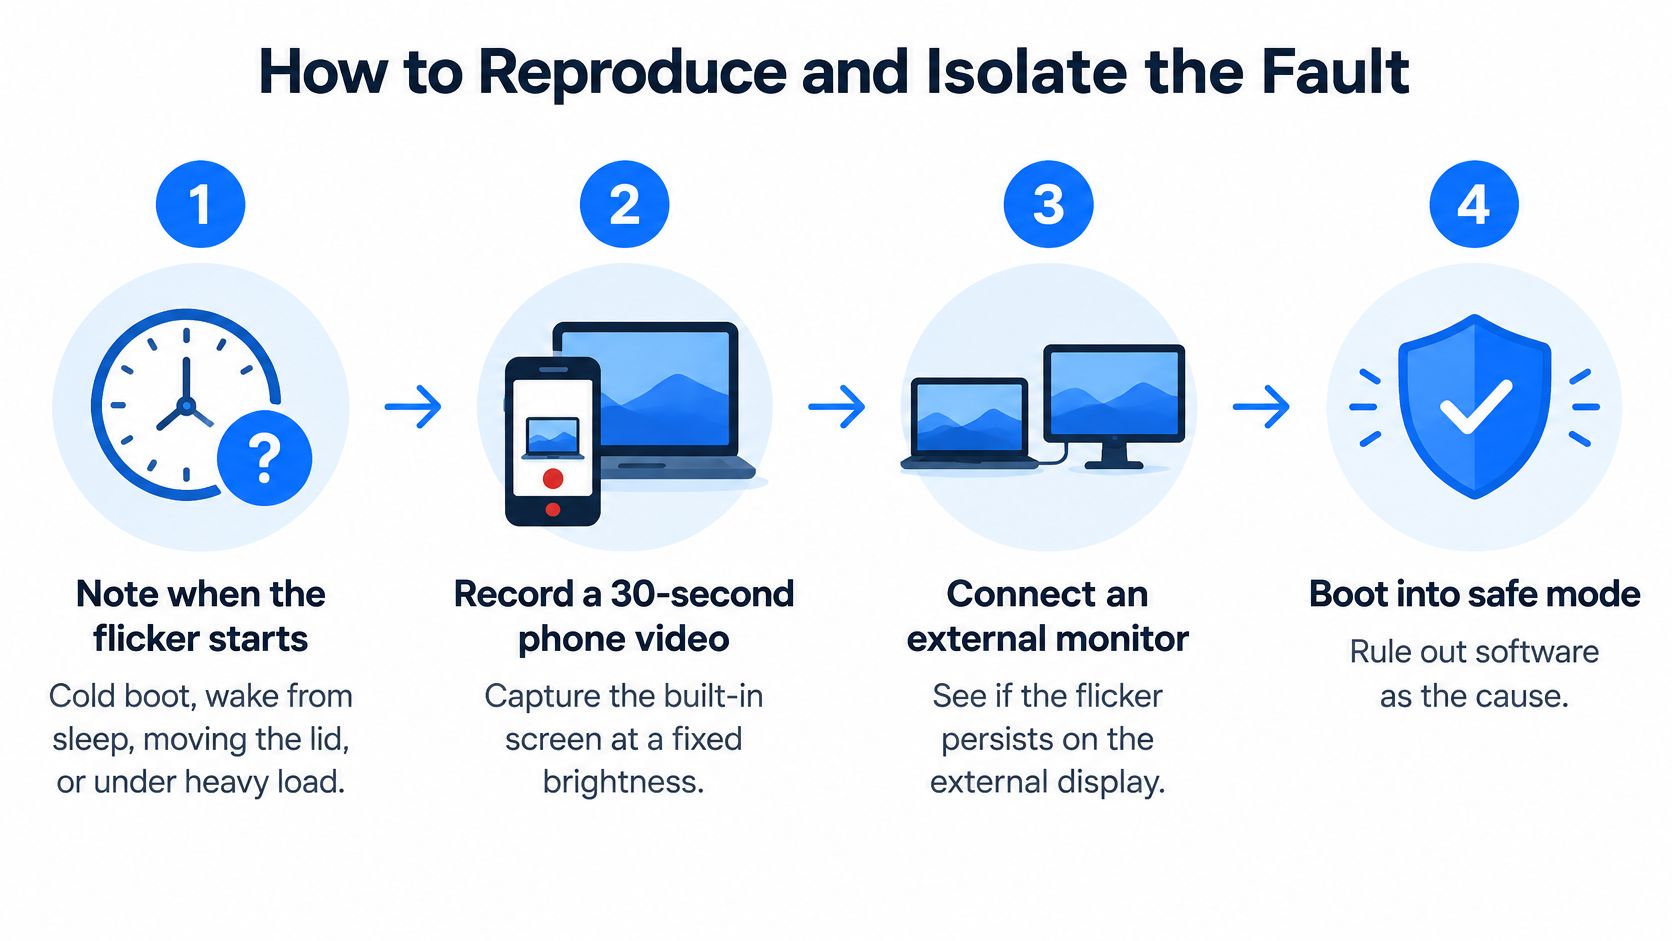
A flicker that appears after wake, at a particular lid angle, or only under one workload points to different parts of the system. Work through these checks in order, keeping settings and conditions consistent so each result is useful.
If you'd rather see the sequence before starting, this walkthrough covers the same ground.
Before step one, back up your files. Intermittent display faults can interrupt a session, so protecting your data before troubleshooting is prudent. Find the purchase invoice and check your AppleCare status too. That makes it easier to assess your repair options before arranging work.
Pin down when it starts. Note whether flicker begins during a cold boot, after waking from sleep, while moving the lid, or when launching a graphics-heavy app. Test the trigger directly rather than relying on what happens during ordinary use.
Record a short video. Keep brightness and lid angle fixed, and rest your phone on a steady surface. A consistent recording gives you something to compare with later. Automatic brightness or changing angles can make two clips difficult to assess.
Connect an external display. If the external screen stays stable while the built-in panel flickers, the display assembly, flex circuitry, connector, or backlight power path deserves attention. If both screens flicker, consider macOS, graphics processing, power delivery, or the logic board. Keep the external display connected during the conditions that usually trigger the fault; a brief test may miss an intermittent problem.
Swap the cable or adapter. Try a known-good Apple-certified part. Apple identifies poor-quality cables and adapters as possible causes of display flicker. Test the replacement through a different port if available, since using the same worn port can leave the original cause in place.
Change the environment. Retest in another room and at a different mains socket, away from fluorescent lighting, microwaves, radios, and other electrical equipment. A change in location helps distinguish interference from a fault that follows the Mac.
Run Apple Diagnostics before opening anything. Follow Apple's Mac display troubleshooting guide and run the available diagnostics before considering hardware work. Do not open the computer as part of basic isolation.
Repeat the checks that produced a result. Recheck cold boot, sleep and wake, brightness, lid position, external display, and the workload associated with the flicker. One successful reboot does not establish that an intermittent fault has cleared.
Record the model, year, macOS version, brightness and refresh settings, and which tests passed or failed. If the results still do not identify the cause, professional diagnostics can help distinguish a panel fault from a cable, connector, or power-path issue before parts are replaced. If a workshop quotes for a screen replacement, ask about the part's source. Apple warns that non-genuine replacement displays may have compromised visual quality or may not work correctly.
Brightness, Refresh Rate and Quick Fixes
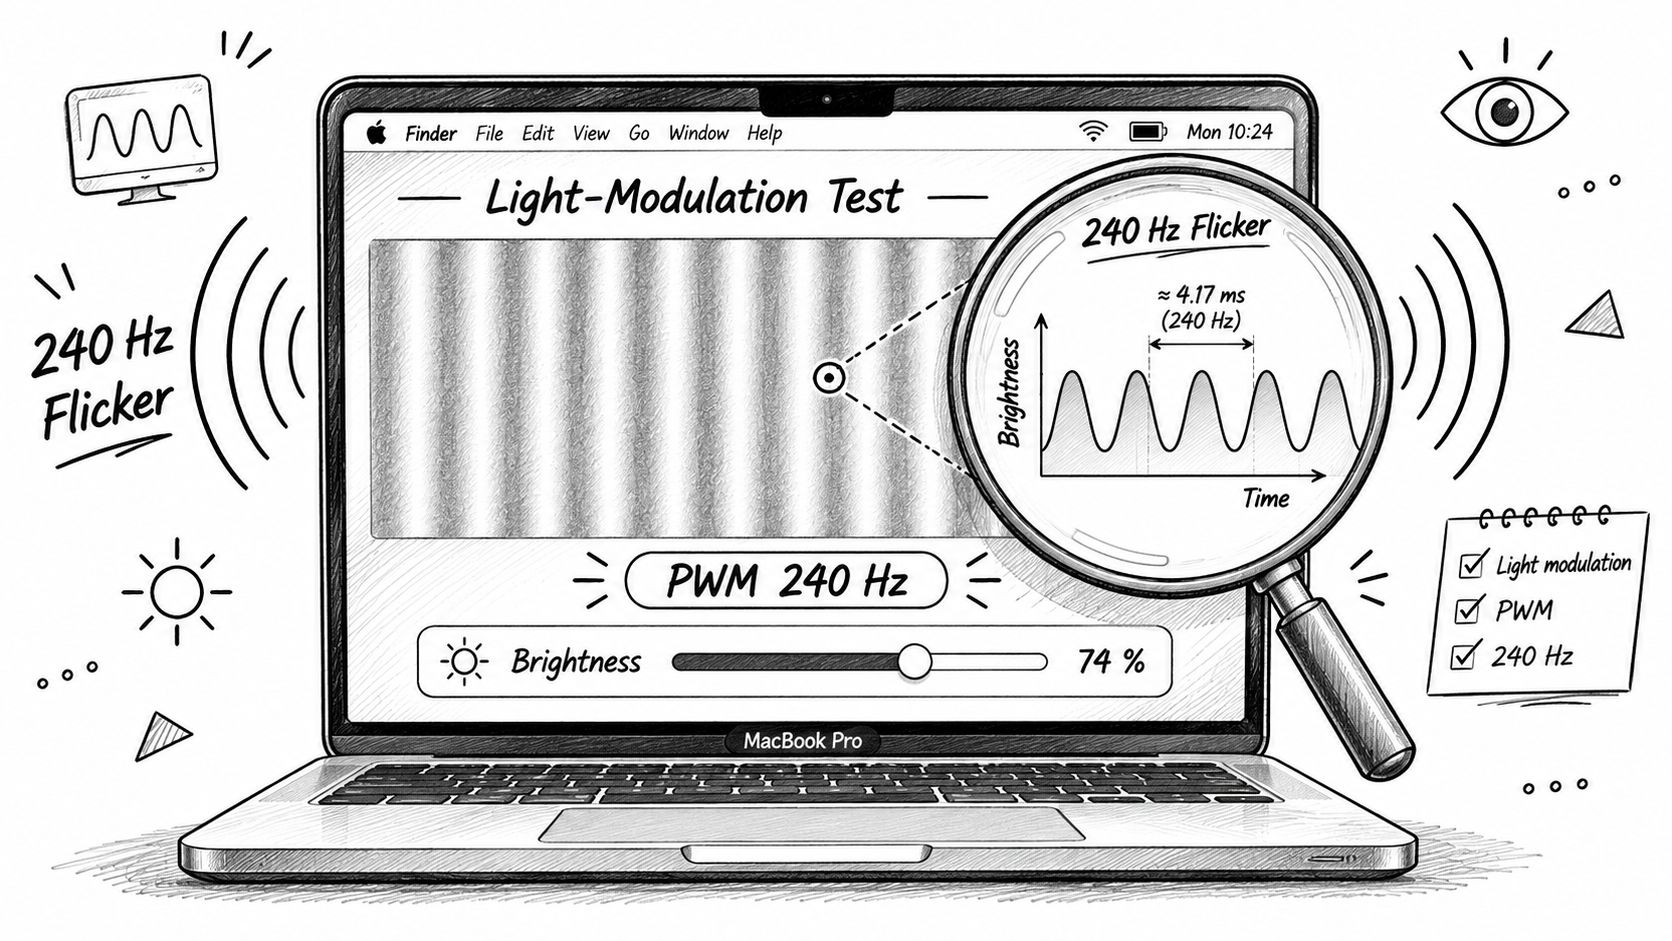
A MacBook that flickers only when dimmed may be reacting to how its display controls brightness, rather than showing a failing panel. Some displays use pulse-width modulation (PWM), switching the backlight rapidly to produce lower brightness. The modulation can be measurable even when the image looks steady, and sensitivity varies: one person may notice shimmer or discomfort while another sees nothing.
A report about OLED flicker complaints describes PWM as a possible source of symptoms, but those measurements do not establish how every MacBook display behaves. Phandroid's coverage of the OLED flicker complaints discusses the reported issue. Treat PWM as one possibility to test, not a diagnosis based on symptoms alone.
How Brightness and Refresh Rate Affect Flicker
Try setting the built-in display to full brightness and use the Mac for a while under the same conditions that usually trigger the flicker. If the shimmer eases, lower-brightness modulation or display electronics may be involved. That result does not prove the panel is healthy, and it does not rule out a cable or software fault.
Simple rule: if flicker changes with brightness, record that response and include it in the diagnosis. Do not treat it as proof that a screen replacement is either needed or unnecessary.
Refresh rate is another setting worth checking, especially when an external monitor is connected. Restore the built-in display and monitor to their default settings, then see whether the fault returns. A change in symptoms helps narrow the cause, but settings alone cannot confirm a hardware failure.
Keep a short record of the conditions when the flicker occurs: brightness, refresh-rate setting, whether the charger is connected, battery level, and how warm the case feels. Include whether the issue affects the built-in display, an external monitor, or both. A repeatable pattern is more useful at diagnosis than a general report that the screen sometimes flickers.
Quick Fixes, From Settings to Software
Work through these checks one at a time, and note what changes. That makes it easier to tell a temporary improvement from a fix.
Raise brightness. Test at full brightness, then return to the level that normally causes flicker. Note whether the symptom follows the brightness change.
Restore the default refresh rate. Test the Mac's built-in screen on its own before reconnecting an external monitor.
Try Safe Mode. If the flicker stops, an app, login item, or extension may be involved. Remove or update likely software, then check whether the fault returns during normal use.
Install the latest macOS update. Restart and repeat the same test that previously triggered the flicker.
Use Apple's reset guidance for your Mac model. NVRAM or SMC reset procedures apply to some Intel Macs; Apple silicon handles resets differently, so do not assume an Intel procedure applies.
Use an external monitor as a temporary workaround if it stays stable. This helps keep work going, but it does not repair the built-in display.
Avoid changing several settings at once. If a change makes no difference, record that too. A flicker that disappears briefly and returns after a restart or later in the day is a useful diagnostic clue, not a confirmed repair. Keep track of what changed and when the symptom came back.
Safety and Interim Use
You still have work to do while you decide on a repair. The question isn't only what's wrong with the Mac, it's whether you should keep using it in the meantime.
Keep working if raising the brightness makes the shimmer disappear and an external display stays stable. Run the built-in screen at that level and carry on.
Switch to an external monitor if the flicker gives you headaches, eye strain, dizziness or nausea, even when nobody else can see anything wrong. Your symptoms are the signal, not the footage.
Stop and get a diagnosis if the Mac runs unusually hot, smells of burning, shows swelling or lifting under the trackpad, shows any sign of liquid, or charges erratically. Those point at power delivery and battery faults, not display settings.
Retire the charger if it's damaged or uncertified. Diagnosing a flicker while feeding the machine from a questionable adapter muddies every test you run.
Log it daily for a week using the same notes from the isolation routine, so you can see whether the fault is stable, improving or getting worse.
Avoid long dim sessions. Take a break every 20 minutes and look across the room for 20 seconds. Low brightness in a dark room is the exact condition that makes PWM flicker worst.
Don't open the case to inspect the panel or reseat a cable yourself. Display flex connectors are fragile, and one slipped pry creates a far bigger bill.
A workaround isn't a repair. Until the isolation tests pass, don't trust that Mac with anything you can't afford to lose mid-session.
Warranty and Backup Steps Before Any Repair
Most owners assume the warranty conversation ends twelve months after purchase. It usually doesn't, and two separate protections apply.
Apple's UK terms say the one-year limited warranty covers manufacturing issues, excludes accidental damage and normal battery wear, and gives a 90-day guarantee on service and replacement parts or the remaining warranty term, whichever is longer, according to Apple's display repair page. That 90-day service guarantee can outlast the machine's original cover, which matters if a repair is done and the fault returns.
Consumer law runs separately and much longer. The same Apple guidance notes that claims for defective goods in England and Wales can generally run up to six years from delivery, while Scotland uses five years. Decide who you contact first, the seller or Apple, and check AppleCare before you authorise anything.
Build the evidence file before you hand the machine over:
The purchase invoice, showing the delivery date that starts the consumer-law clock.
Video of the fault at several lid angles, plus a clip at low brightness and one at full.
The diagnostic log from the isolation routine, with pass and fail marked.
A backup made before any diagnostic work, because an intermittently failing display can take files with it.
Worth knowing: opening the device yourself, or authorising third-party work, may complicate Apple's support position. Ask before you agree, not after.
Out of warranty, ask for a diagnosis that separates a complete display assembly from a connector or board-level fault. The price difference is significant, and only one of those is the actual fault.
Choose a Repair Route and Book a Diagnosis
With a symptom pattern and a log in hand, the repair decision becomes straightforward. Match the diagnosis to the route below and you can see immediately which rows are DIY and which need a bench.
Diagnosis | Usual fix | Route |
|---|---|---|
Software or refresh-rate setting | Change display settings or update macOS | Self-service, no parts needed |
Display cable or flex fault | Replace the display cable or flex | Workshop repair |
Panel or backlight fault | Replace the display assembly | Workshop repair with genuine parts |
Backlight power path or connector fault | Micro-soldering or connector repair | Board-level repair |
Logic board or GPU fault | Board-level diagnostics, then repair or replacement | Board-level repair |
Undiagnosed after all checks | Full written diagnosis | Workshop diagnostic |
The first row is yours to handle. Everything below it needs someone who can inspect the display connector and flex path under magnification, checking for contamination, torn shielding, hinge-area fatigue, liquid indicators and abnormal resistance readings against board documentation. That inspection is what separates a cable fault from a panel fault, and the MacBook screen replacement route is only correct once the panel itself is confirmed.
Two patterns catch people out. Intermittent cable faults depend on lid position, so they look like panel failures until the lid is moved slowly through its range. Driver and power faults show up only at particular brightness, refresh, temperature or charging conditions, which is why a workshop that tests at one setting finds nothing. Apple doesn't publish a UK-specific failure or success rate for these repairs, so a responsible workshop tracks its own: confirmed cause, no-fault-found, parts-replacement success, recurrence within 30 days, and repeat failures by model and year. Anything under 20 to 30 comparable cases isn't a rate worth quoting.
Stop the DIY work if you find liquid damage, or if a charging or power fault survives a cable swap. Book a diagnosis when the flicker outlasts the isolation tests, when the external display test points at the panel or the board, or when there's any power, charging or liquid sign at all. Bring the model and year, the invoice, the phone video and the written log, and confirm your files are backed up.
Steel City IT repairs all types of Apple and Mac computers, including MacBook Air and Pro, from a Frecheville workshop serving Sheffield, Birley, Hackenthorpe and Woodhouse. We run board-level diagnostics, micro-solder power and charging faults, and replace screens and cables with genuine parts, usually within a few days. Send the log and video ahead and ask for a written diagnosis that separates panel, cable and board faults before any work is authorised.
If your tests point to the panel, the display cable or the board, Steel City IT can take it from there with a diagnosis that names the actual fault rather than replacing the most expensive part first. Send your video, log and model details through Steel City IT before you book, and we'll tell you what the symptoms suggest and what the repair involves.