
Custom Gaming PC Case Guide for Fit and Airflow

Pick the biggest mesh tower you can afford and cooling will sort itself out. That's the most popular advice about a custom gaming PC case, and it's wrong in the way that costs people money. A huge box with the wrong internal layout can still trap a graphics card against glass, feed a radiator hot air, or leave nowhere for a power plug to bend.
Glass doesn't cool a card. RGB doesn't cool a card. What works is measured fit for your exact GPU and cooler, a clean path for cool air in and warm air out, and fan speeds you can live with in the room where the PC sits. The UK games market was worth £8.764 billion in 2025, up 7.4% from £8.158 billion in 2024, according to the Ukie UK Games Market Valuation 2025. That growth includes plenty of PC hardware spending, but spending more doesn't fix a case that's 10 mm too short.
I would choose the case last, after the card and cooler are locked. Then I'd prove it fits on paper, with spare room, before anyone talks about colour.
Table of Contents
Clearance Limits That Decide the Case - Read the Table as a Knockout Test - Board Size Is Not Case Size
How to Size the Case Before You Buy - The Hour Test After Assembly - What to Photograph for a Fit Check
Airflow Materials and Noise Together - A Fan Map That Works in Most Rooms - Mesh, Damped Steel and Glass Compared
Cable Routes Mods and Running Cost - A Routing Order That Stays Serviceable - What the Case Does and Does Not Do to Your Bill
Fit and Heat Problems After Assembly - The Three Fit Faults - Heat, Noise and Dust After the First Week
Confirm the Case with a Local Fit Check - When a Local Check Saves Real Money
Clearance Limits That Decide the Case
Keep 15 to 20 mm spare beyond your graphics card's stated length. Treat the maker's maximum GPU length as a ceiling you shouldn't touch, not a target. A front fan, a dust filter frame, a radiator end tank or a stiff power plug will eat the final gap you thought you had.
Four numbers knock out most good looking cases before they reach a desk. You need GPU length including the power plug bend, CPU cooler height, radiator thickness plus its fans, and PSU length. If any one of those fails, the side panel won't close, the card won't seat, or you'll be moving a radiator on build day and discovering the new position clashes with something else.
Read the Table as a Knockout Test
Start with the row your card fits, not the row you prefer for desk space. A compact chassis that looks tidy in a small room is a poor bargain if it forces a smaller cooler than your CPU needs at sustained load.
Chassis class | GPU length to allow | Cooler height | Radiator fit | PSU and board notes |
|---|---|---|---|---|
Compact or SFF | 280 to 310 mm after keeping 15 to 20 mm spare | Up to about 155 mm for an air cooler | 240 mm only if it does not steal GPU length | Short PSU often required, Mini-ITX or micro-ATX usually fits best |
Mid-tower | 340 to 380 mm after keeping 15 to 20 mm spare | About 165 to 175 mm for an air cooler | 240 or 360 mm front or top | Standard ATX PSU, ATX board fits comfortably |
Full tower | 380 mm or more after keeping 15 to 20 mm spare | 175 mm or more for an air cooler | Front and top 360 mm possible together | Longer PSU fits, room for a second radiator and extra drives |
Panoramic compact example | 300 mm stated, left 15 mm for a 285 mm card | Check before assuming a tower cooler | Front radiator can erase the remaining gap | Vertical GPU mount needs extra depth and can sit against glass |
A compact or small form chassis often stops near the top of that first row. You'll get a 240 mm radiator only if the front isn't already blocking the card, and tall twin tower air coolers are frequently too proud of the motherboard tray. That's fine for a modest card and a low profile cooler. It's a dead end for a long triple fan card you plan to keep through the next upgrade.
A mid-tower is the usual gaming default for a reason. It gives you proper GPU room, enough height for a serious air cooler, and a choice of front or top radiator mounting without forcing a compromise on the other part. A full tower earns its size when you need two radiators, a long liquid cooled card, or a longer high capacity supply with bulky cables. Buying full tower volume for a single short card and one air cooler mostly buys you empty space and a heavier lift onto the desk.
Board Size Is Not Case Size
Don't confuse motherboard footprint with clearance for everything else. As a working guide, Mini-ITX is about 170 by 170 mm, micro-ATX is about 244 by 244 mm, and ATX is about 305 by 244 mm. A case can accept an ATX board and still fail on GPU length once a front radiator goes in.
Practical rule: the board rarely decides the case once the graphics card is chosen. The card, its plug, and the radiator stack decide it.
The panoramic example in the table shows why nominal fit isn't working fit. A 285 mm card in a case rated at 300 mm leaves only 15 mm, and that becomes inadequate once you add connector bend and front hardware. Vertical GPU mounts make this worse, because they need extra depth and can press the card's fans close to side glass, where there's almost no fresh air to pull.
Write down your four measurements before you shortlist anything. Match them to one row, with spare room left over, then use a PC component compatibility checker to catch socket, chipset and connector mismatches that a tape measure can't see. If your card only fits by ignoring the plug, it doesn't fit.
How to Size the Case Before You Buy
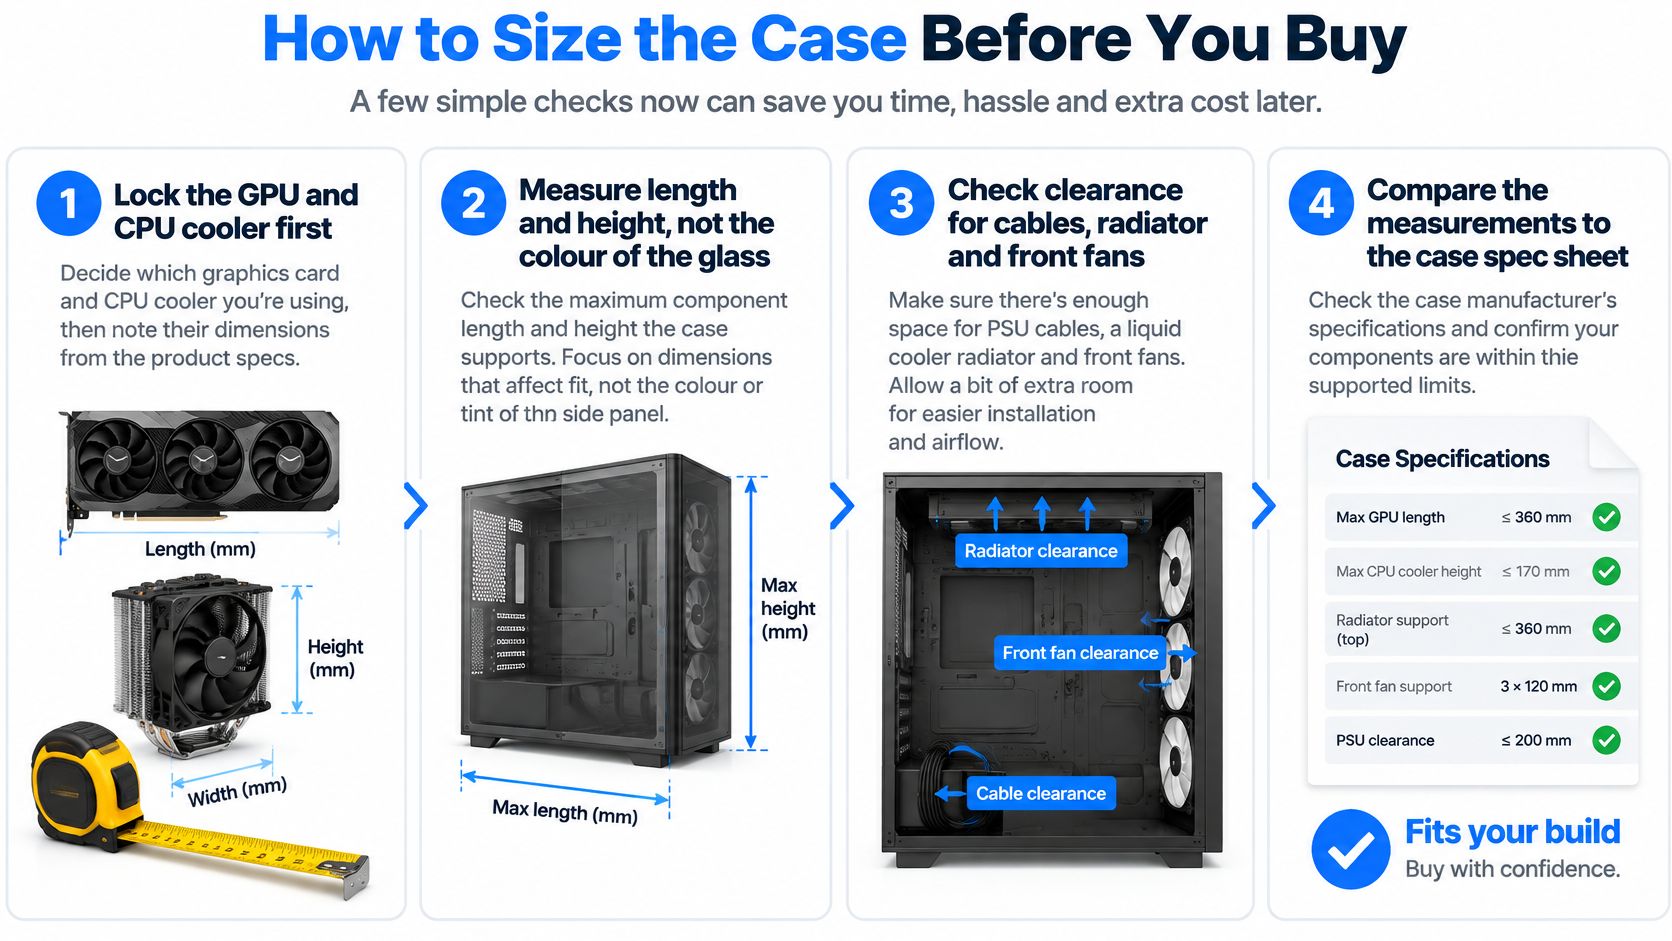
You don't need workshop kit to size a case properly. You need the parts list, the makers' dimension drawings, and the discipline to measure in the right order. Most failed fits happen because someone picked the case first and hoped the expensive parts would adapt.
Follow these seven steps in order. Each one removes a different kind of surprise.
Lock the GPU and CPU cooler first. Those two parts set length and height. Case colour, glass tint and lighting change nothing about whether the build assembles.
Add 15 to 20 mm beyond the card's stated length. That allowance covers the power plug bend, a front fan and any radiator sharing the same edge. The Vivid Repairs guide to choosing a gaming PC case recommends retaining 15 to 20 mm beyond the graphics card's stated length because front fans, radiators and cabling can consume the remaining space.
Confirm board form factor and the small clashes. Check RAM height under an air cooler, whether a top radiator hits the VRM heatsink or motherboard shroud, and whether the cooler tower overhangs the first memory slot.
Check PSU length and cable bulk. An ATX 3.0 supply with stiff native cables needs room behind the tray and below the card. In a dual chamber layout, confirm a bottom mounted supply or its cables don't block a long card or bottom intake fans.
Map intake and exhaust before choosing fan sizes. Cool air should reach the GPU directly. Warm air should leave at the rear or top without being pulled straight back in through an unfiltered opening next to it.
Pick materials and looks last. Decide mesh versus damped panels, check how dust filters come out, and confirm you can clean them without removing fans or a radiator.
Test the finished, panelled build. Fix fan speeds so automatic curves can't hide a poor enclosure, then log temperatures through a full combined load rather than a five minute game launch.
The Hour Test After Assembly
Short tests flatter bad cases. Heat soak takes time, and VRM temperatures climb slowly when a top radiator or glass panel restricts the air moving over the board. Run a CPU load such as Prime95 Small FFTs and a GPU load such as FurMark, log CPU, GPU and VRM temperatures for a complete hour at 15 second intervals, and note room temperature at the start.
Judge the result against ambient, not against a single magic number you saw in a review from a colder room. A build that's stable, with no parts touching and intake and exhaust paths unblocked through that full hour, has passed a real acceptance test. A build that looks fine at minute five and throttles at minute forty hasn't.
Watch for three slips while you work. Don't fit a thick front radiator before rechecking GPU length with its fans attached. Don't trap the GPU power lead against side glass to force the panel shut. Don't assume fans supplied in the box point the right way, check the frame arrows or hub direction on every one.
For builders considering a fully bespoke enclosure rather than an off the shelf chassis, suppliers of custom sheet metal enclosures show the same principle at fabrication level. Vent positions, bend allowances and internal mounting depth have to be specified before metal is cut, because you can't stretch a finished panel by 15 mm.
What to Photograph for a Fit Check
If you're asking a shop to confirm fit remotely, send clear photos and measurements rather than a parts list alone.
Card length and thickness: include the power connector position, top or end mounted.
Cooler height and width: show RAM clearance if it's an air cooler.
Radiator stack: radiator thickness plus fan thickness, measured together.
PSU label and length: show the connector types you have.
Those four items let someone check the build properly. A photo of the box badge doesn't.
Airflow Materials and Noise Together
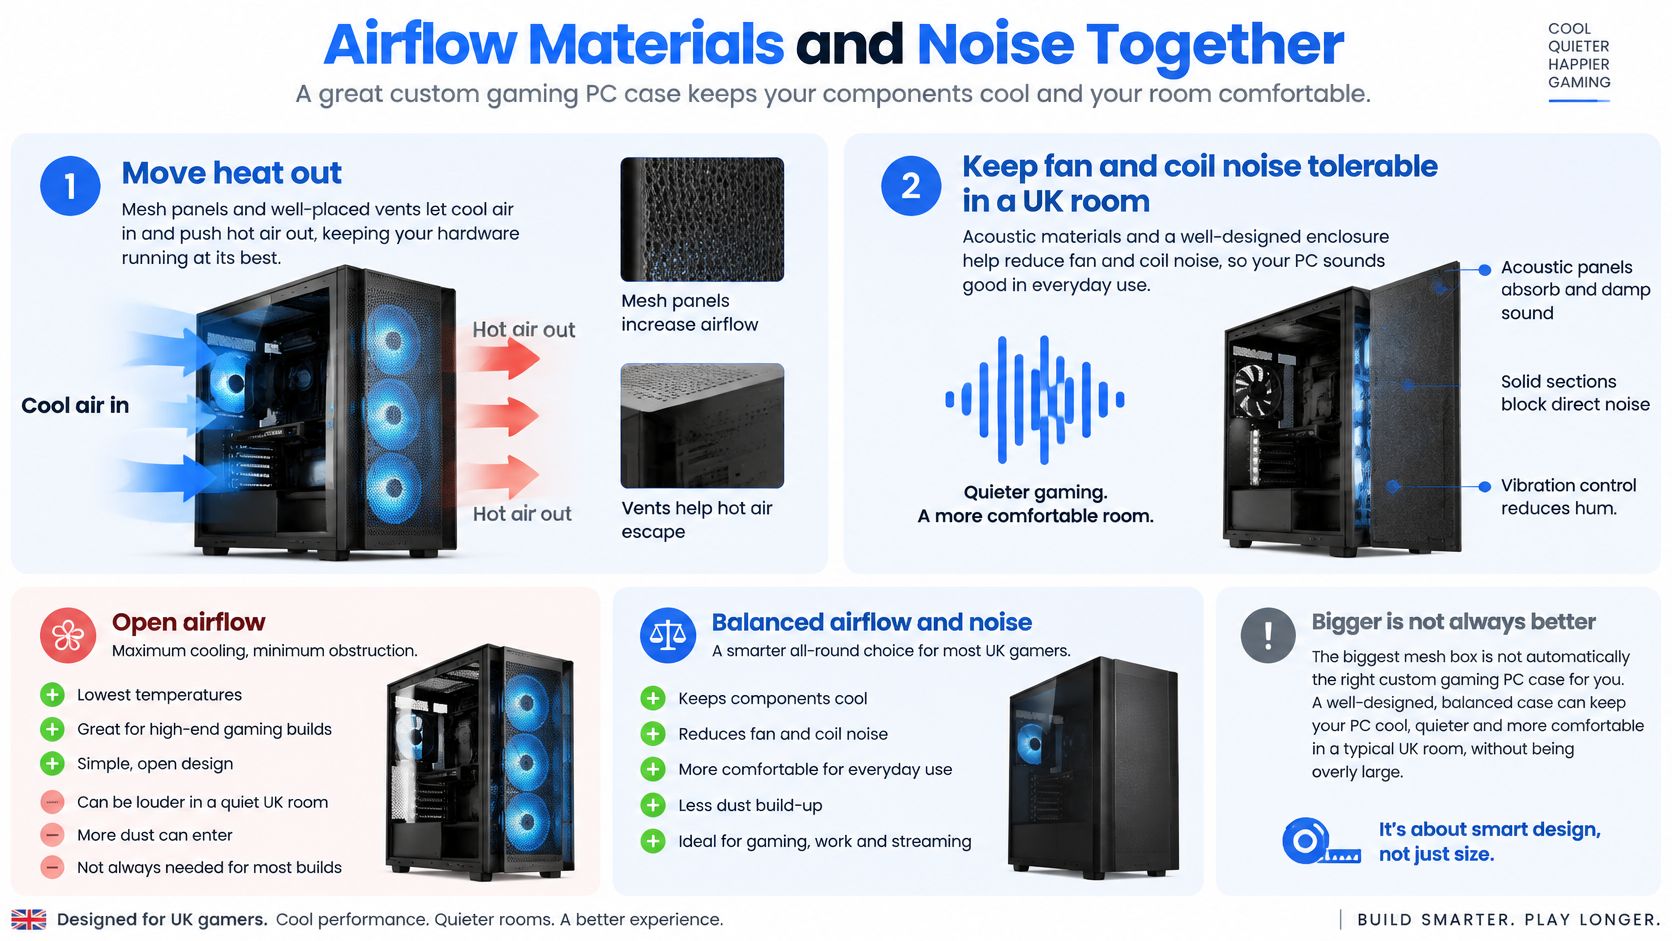
Glass sells cases. Air keeps cards alive. A custom gaming PC case has to dump heat without turning the room into a turbine, and the pretty option loses if the GPU fans are millimetres from a solid panel or breathing their own exhaust.
The Vivid Repairs review of the Gamdias Talos E3 case recorded a compact panoramic case with three 120 mm fans reaching 72°C CPU peaks under AIDA64 and 68°C GPU temperatures under FurMark. Those are liveable numbers, but the lesson is about headroom: when a card already fills the chamber, the last 15–20 mm of spare clearance is what lets intake air reach the fans instead of recirculating off the glass. In a dual chamber layout, an airflow divider that separates hot exhaust from intake can lower GPU temperatures by keeping that exhaust away from the card's feed stream. Volume alone does less than a clean path.
A Fan Map That Works in Most Rooms
Use front or side intake through a washable filter, and rear and top exhaust. Position intake so the GPU fans pull from the cool stream, not from the card's own exhaust trapped under a shroud. Keep the path short and obvious, in at the front and bottom, out at the back and top.
Positive pressure, with slightly more filtered intake than exhaust, helps dust control. It only works if exhaust isn't choked. Force air in and give it nowhere to go, and turbulence rises, fans work harder, and hot pockets form around the card and VRMs. Retest with the side panels fitted because panel off results tell you almost nothing about finished noise.
Mesh, Damped Steel and Glass Compared
Mesh fronts drop intake restriction and usually give the lowest temperatures for a given fan speed. Lower speed for the same temperature is where the noise benefit comes from. The catch is dust. A mesh front on a desk in a dusty corner is only a win if the filter removes easily and someone cleans it.
Solid or damped panels with thicker steel cut turbulence noise and high frequency fan tone. They can raise temperatures if intake vents are narrow or filters are filthy, so they suit efficient parts, sensible power limits and side or bottom intake that isn't strangled. For a modest gaming CPU, a 240 mm radiator is often enough in this kind of build. A 360 mm AIO earns its space on a high wattage chip that sustains heavy all core loads, not as decoration on a CPU that never gets hot in games.
Tempered glass looks clean and does nothing for cooling. It punishes a vertical GPU parked against it, because the card's fans sit millimetres from a solid surface. A large triple fan card such as the MSI GeForce RTX 3080 needs that breathing room before purchase, along with a power supply that has the capacity and right 8 pin PCIe connectors. If you want glass, keep the card horizontal, feed it from front or bottom intake, and accept that you're choosing the view over the easiest airflow path.
A single 140 mm fan turning slowly often moves useful air more quietly than several small fans spinning fast to overcome a blocked front panel.
Record ambient temperature, fan duty cycle, component power limits, and peak and sustained temperatures for the finished build. That baseline matters when you upgrade the GPU later. Without it, you're comparing a new card's behaviour against a memory of how the old build felt on a different day, in a different room temperature, at unknown fan settings. During diagnosis, clean or briefly remove a restrictive filter if temperatures look wrong. If that alone drops temperatures sharply, you've found restriction, not a faulty cooler.
Cable Routes Mods and Running Cost
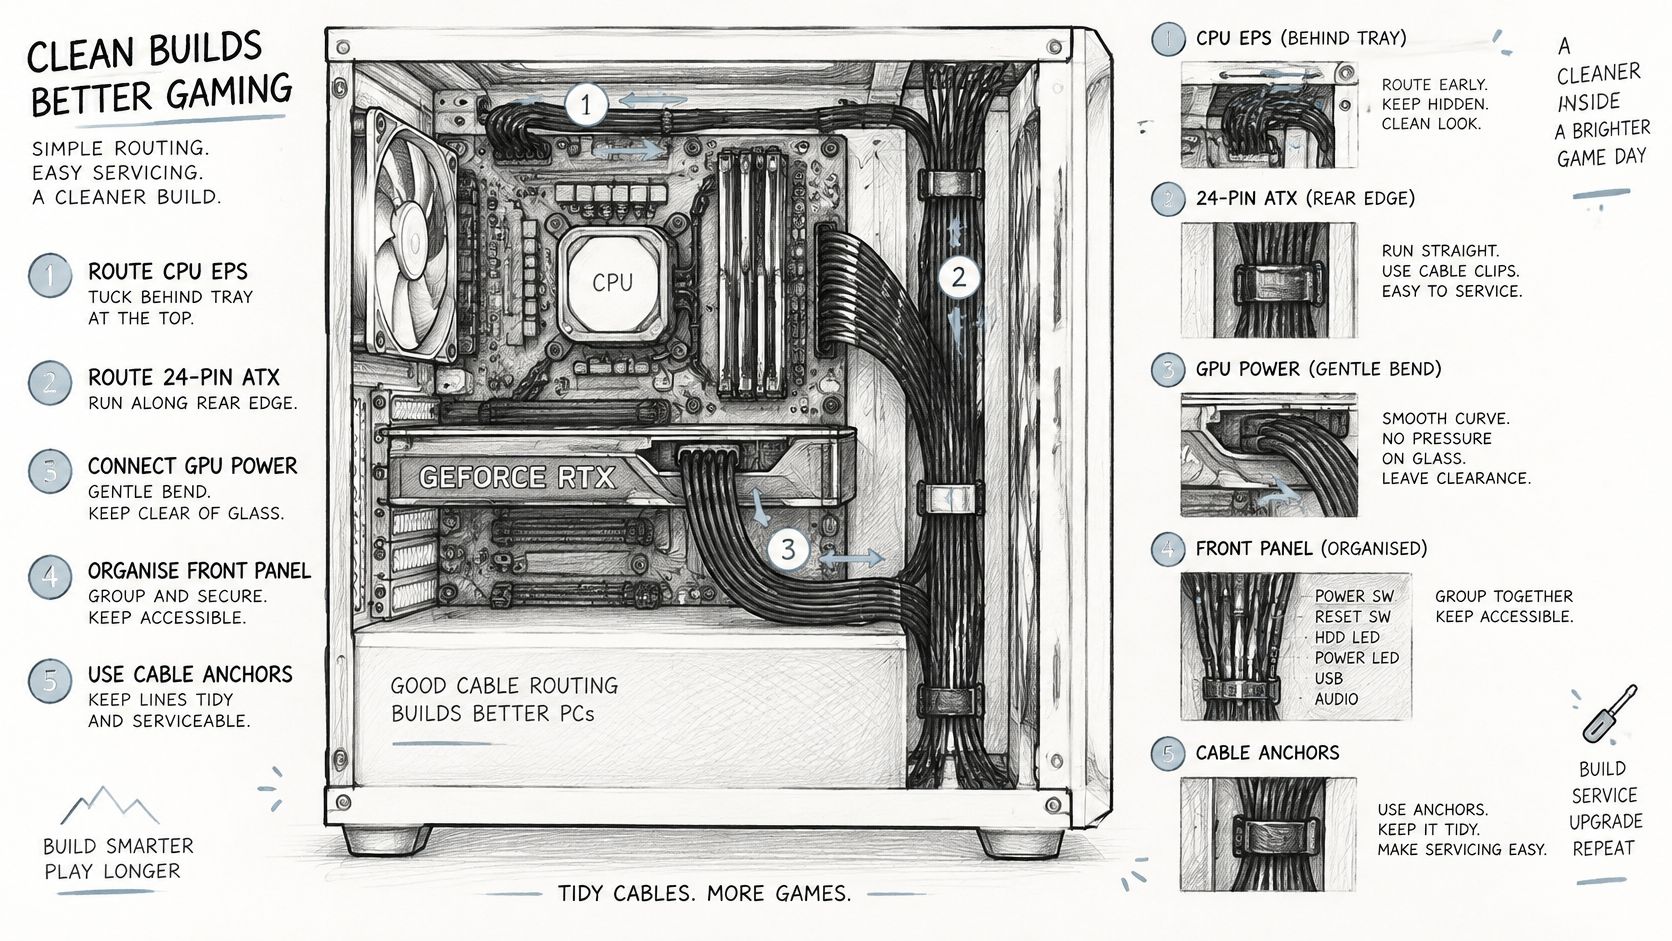
Treat customisation as serviceability, not a sticker kit. A build you can't unplug, clean or upgrade without cutting ties and removing glued panels isn't well customised, however tidy it photographs. Route cables so the next repair or GPU swap takes minutes, not an afternoon.
The image below shows the routing principle to aim for, with looms kept behind the tray and bends kept gentle.
A Routing Order That Stays Serviceable
Run the motherboard 24 pin and CPU EPS leads along the back first, because they're the bulkiest and hardest to move later. Route GPU power next, with a gentle bend and no pressure from the side panel or glass. Keep front panel leads short of fan intakes, and tie spare SATA power away from the bottom filter so it can't sag into a fan or block the PSU intake.
A fully modular supply helps because unused leads stay in the box. A back connect or BTF style board hides much of the loom behind the tray, but only if the case has enough depth behind that tray for the rear facing connectors. Measure that depth before you buy the board, not after. Custom length cables look sharp, yet they should still unplug cleanly for a repair. If a cable only reaches when pulled tight across a sharp tray edge, it's the wrong length.
Sensible mods earn their place. Consider a mesh insert in place of a solid front, a restrained RGB hub on its own header so lighting faults don't take fans with them, and taller feet or a stand that stops carpet sealing the PSU intake. Avoid spray paint on mesh, which thickens and blocks holes, glued panels that cover filters, and vertical mounts chosen only for the look.
This video walkthrough is useful for seeing bend radius and tray routing in practice before you commit to cable lengths.
What the Case Does and Does Not Do to Your Bill
Ofgem lists a Great Britain electricity unit rate of 26.11 pence per kWh for 1 July to 30 September 2026 on its energy price cap unit rates page. A gaming setup may draw roughly 250 to 600 W during demanding use and 70 to 150 W at idle. At those draws, a case alone doesn't slash your bill. Anyone promising that is selling you a panel, not physics.
Poor airflow still costs you. Fans forced to run at high rpm use a little more power and make a lot more noise, and sustained heat is unkind to components over years. A chassis too tight for a later, more efficient cooler can also force an early replacement you'd otherwise avoid. The larger energy saving usually comes from GPU power limits, sensible sleep settings, turning off idle lighting hubs you don't need, and a supply that isn't wildly oversized and noisy for the build.
Over five years, a case earns its price if filters come out without tools, the side panel still fits after a GPU swap, and you don't have to snap off drive cages permanently to fit the next card. A quiet 1440p build suits a damped mid-tower with fewer, larger fans. A high wattage enthusiast build needs radiator space and unobstructed exhaust far more than another light strip. Buy the serviceable chassis first and add decoration only where it doesn't block air, filters or connectors.
Fit and Heat Problems After Assembly
The fault that shows up most often after a home build is simple. The side panel won't close because the GPU plug or cooler sits proud of where the panel needs to be. Everything booted on the bench, the games launched, and then the final panel exposed the measurement that was skipped.
Use the table as a symptom, cause and fix list. Work through one change at a time, then retest, so you know what fixed the problem.
Symptom | Likely case cause | Fix |
|---|---|---|
Side panel will not close | GPU plug, cooler or front radiator over the stated limit | Free 15 to 20 mm, move radiator, or use a larger class |
GPU hotter with panel on | Recirculation or vertical card against glass | Horizontal mount or airflow divider, retest panelled |
CPU climbs after 30 minutes | Heat soak, weak exhaust, radiator fed hot GPU air | Hour log, fix exhaust path, then retest |
Loud at idle, temps fine | Small fans at high rpm or a clogged filter | Clean filter, fewer larger fans, lower duty |
Heavy dust within weeks | Negative pressure or carpet blocking the PSU intake | Filtered intake, raise feet, check fan direction |
New GPU does not fit though the spec matched | Front fan, cables or radiator consumed the gap | Remeasure with those parts installed |
The Three Fit Faults
Panel won't shut means the spare allowance was ignored or a front radiator stole GPU length. Move the radiator to the top if clearance allows, reroute the plug with a gentle bend rather than a kink, or step up a chassis class. Don't bow the glass outward and call it fitted. That's a return decision, best made before custom cables are cut to length for the wrong case.
GPU much hotter with the panel on than off points to recirculation or glass sitting too close on a vertical mount. Restore a horizontal mount, add a divider that separates intake from exhaust where the layout supports it, and retest fully panelled. If a guide to fixing GPU overheating style check shows the card itself is healthy, the enclosure is the problem, not the cooler paste.
A new card that fitted on paper but not in metal needs honest remeasuring. Count the front fan, its screws, any radiator and the PSU cables gathered behind the card. The badge figure assumed some of those parts weren't there. Your build has them, so your available length is shorter.
Heat, Noise and Dust After the First Week
A CPU that's fine in a five minute game but climbing after half an hour is heat soak. Look for weak top exhaust or a radiator fed with warm GPU exhaust air. Swap radiator fans to intake only if that doesn't starve the card of cool air, improve the exhaust path, then log a full hour at the same fan duty to confirm the change worked.
Bench habit: never judge noise or temperature with the side panel off. You're not going to use the PC that way, and the numbers won't match the finished build.
Whine at idle with decent temperatures usually means too many small fans, a restrictive filter, or a fan curve that never settles. Clean the filter first because it's free. Then try fewer, larger fans at lower duty, and set a minimum speed that avoids constant ramping in desktop use.
Dust caked inside within weeks means negative pressure is pulling unfiltered air through every seam, or the case sits on carpet with its PSU intake sealed. Add filtered intake, raise the feet or move the case onto a hard stand, and confirm every fan points the way you think it does. One reversed intake can undo the whole pressure plan.
Sorting a filter, fan direction or fan curve is an evening's work. A card that physically doesn't fit, or a cooler that holds the panel open, means returning or exchanging the case. Make that call early, before you modify panels, paint mesh or order cables that only suit that chassis. Retest after every change at the same ambient and fan duty, otherwise you're comparing different conditions and learning nothing.
Confirm the Case with a Local Fit Check
The decision is straightforward once the measurements are honest. If GPU length, cooler height and radiator stack all sit well inside one chassis class, with spare room after plugs and fans are counted, and you're willing to log an hour of temperatures, order the case and build at home. You'll enjoy it more because you won't be problem solving on build day.
Stop and get a fit check if your card sits within 20 mm of the published limit. Do the same if the front must hold both a radiator and fans in front of a long card, or if you want a glass panel with a vertical mount. Those are the builds where a photograph hides the clash and a bench check against the card finds it in minutes.
When a Local Check Saves Real Money
A local bench can catch faults a parts list can't. That includes PSU connector type and capacity for the card you want, a radiator clashing with a motherboard heatsink, RAM fouling a cooler tower, and whether the finished system stays stable under sustained load. Those checks matter more than another RGB strip, because they decide whether the PC works on day one or comes apart again on day two.
We're based in Frecheville and build custom gaming PCs for Sheffield customers, including Birley, Hackenthorpe and Woodhouse. Our gaming PCs can be customised with your choice of CPU, GPU, RAM, storage (HDD or SSD), and cooling systems, matched to a case rather than forcing a pretty box around the wrong card. If you're weighing builders, our overview of custom PC builders in the UK sets out what to compare beyond headline specifications.
You can message us to have your existing PC checked for fit with a large triple fan card before you spend on it. That check covers case room for the card and whether your supply has the capacity and connectors it needs. It's a short conversation that prevents the common order of buying the card, discovering the clash, and then buying a case and supply under pressure.
One policy point deserves plain language. Custom-built, configured or personalised computers and components are non-returnable unless faulty. A wrong case choice is therefore an expensive mistake once a system has been cut, cabled or sold as a configured build. Confirming fit first isn't caution for its own sake. It's how you avoid owning a chassis that's perfect for a PC you don't have.
Build it yourself when every clearance still has spare room after fans, radiators and plugs are counted. Ask for a check when any measurement is tight. That single habit separates a custom gaming PC case chosen around your hardware from one chosen around a product photo.
If your measurements are tight, send us your card, cooler and radiator dimensions and we'll confirm whether your chosen case will fit, stay cool and stay quiet under sustained load. We build and test custom gaming PCs in Frecheville for customers across Sheffield, matching CPU, GPU, RAM, storage and cooling to the right chassis first time. Visit Steel City IT to ask for a fit check or start a custom build.