
How to Migrate Data from HDD to SSD: Step-by-Step Guide

The laptop fan is loud, File Explorer takes an age to open, and the new SSD is still in its box on the desk. You want Windows, photos and the accounts package on the faster drive tonight, not a weekend of reinstalling software. That job is how to migrate data from HDD to SSD without turning one working computer into two half-working disks.
A clone can copy a tired Windows installation, including its faults. A safe move treats the old drive as the only copy you currently trust, checks it first, and leaves it untouched until the new drive has proved it can boot and open real files.
Table of Contents
How to Clone HDD to SSD Step by Step - Run the copy without touching the old disk afterwards - What a good first boot looks like
Fix Boot and Encryption Problems After the Clone - Match the fault before you reinstall - When the boot files themselves are incomplete
Retire the Old HDD Safely or Keep It as a Backup - A retirement sequence you can audit
Pick the Right Migration Method for Your Drive
The right method depends on drive health, free space and whether you want the old Windows installation. Match your machine to one row before you download cloning software.
Situation | Recommended method | Main risk | Watch for |
|---|---|---|---|
Healthy HDD, SSD larger than used space | Whole-disk clone | Boot setup not copied correctly | Confirm SSD capacity exceeds used space by about 10% |
SSD smaller than HDD, used space fits | Clone with partition resizing | Partition layout misaligned | Clear large media folders before cloning |
HDD with read errors or clicking | Back up readable files, then sector-aware image | Repeated reads damage the drive further | Stop retrying the clone at once |
BitLocker-encrypted system drive | Clone after confirming recovery key | Lockout after hardware change | Recovery key stored away from the drive |
Laptop with one drive bay | Clone via USB enclosure or adapter | Power loss during the clone | Use mains power and keep the enclosure stable |
Clean system wanted | Fresh Windows install and copy user folders | Missing licences and apps | Note licence keys and reinstall software |
Healthy HDD, enough room. A desktop or laptop with Windows on one healthy drive, and an SSD at least as large as the used space, is the usual case. A whole-disk clone keeps Windows, applications, drivers and the boot setup together. File copy alone leaves the new drive unable to start the PC.
Smaller SSD, used space still fits. Cloning software can shrink partitions so the copy lands on a smaller SSD. Clear large video libraries and game folders first, or the resize step fails halfway through.
Read errors or clicking. Stop. A normal clone hammers the failing surface. Copy readable files, then use a sector-aware image only for what can still be read.
BitLocker. A disk swap can throw the recovery screen. Have the recovery key before you change hardware.
One laptop bay. Put the SSD in a USB enclosure or SATA-to-USB adapter, clone, then swap the drives. Keep the laptop on mains power.
A clean system. Years of leftover software often take longer to clone and repair than a fresh Windows install plus a copy of your user folders.
Two checks decide the row. Compare used space with SSD capacity in Windows storage settings, and see whether the HDD still reports as healthy. If either answer is no, do not start a standard clone.
Back Up and Health-Check the HDD Before Cloning
A migration copy is not a backup. If the hard disk drive has corrupted sectors, malware or filesystem errors, those problems travel onto the SSD with everything else.
A 2025–2026 summary of the UK government's Cyber Security Breaches Survey reports that 88% of UK businesses use some form of backup, 74% use cloud backup and 48% use other methods such as external drives or separate systems. That still leaves 12% with no backup at all. For a small firm, the afternoon you swap disks is a bad time to discover you are in that group.
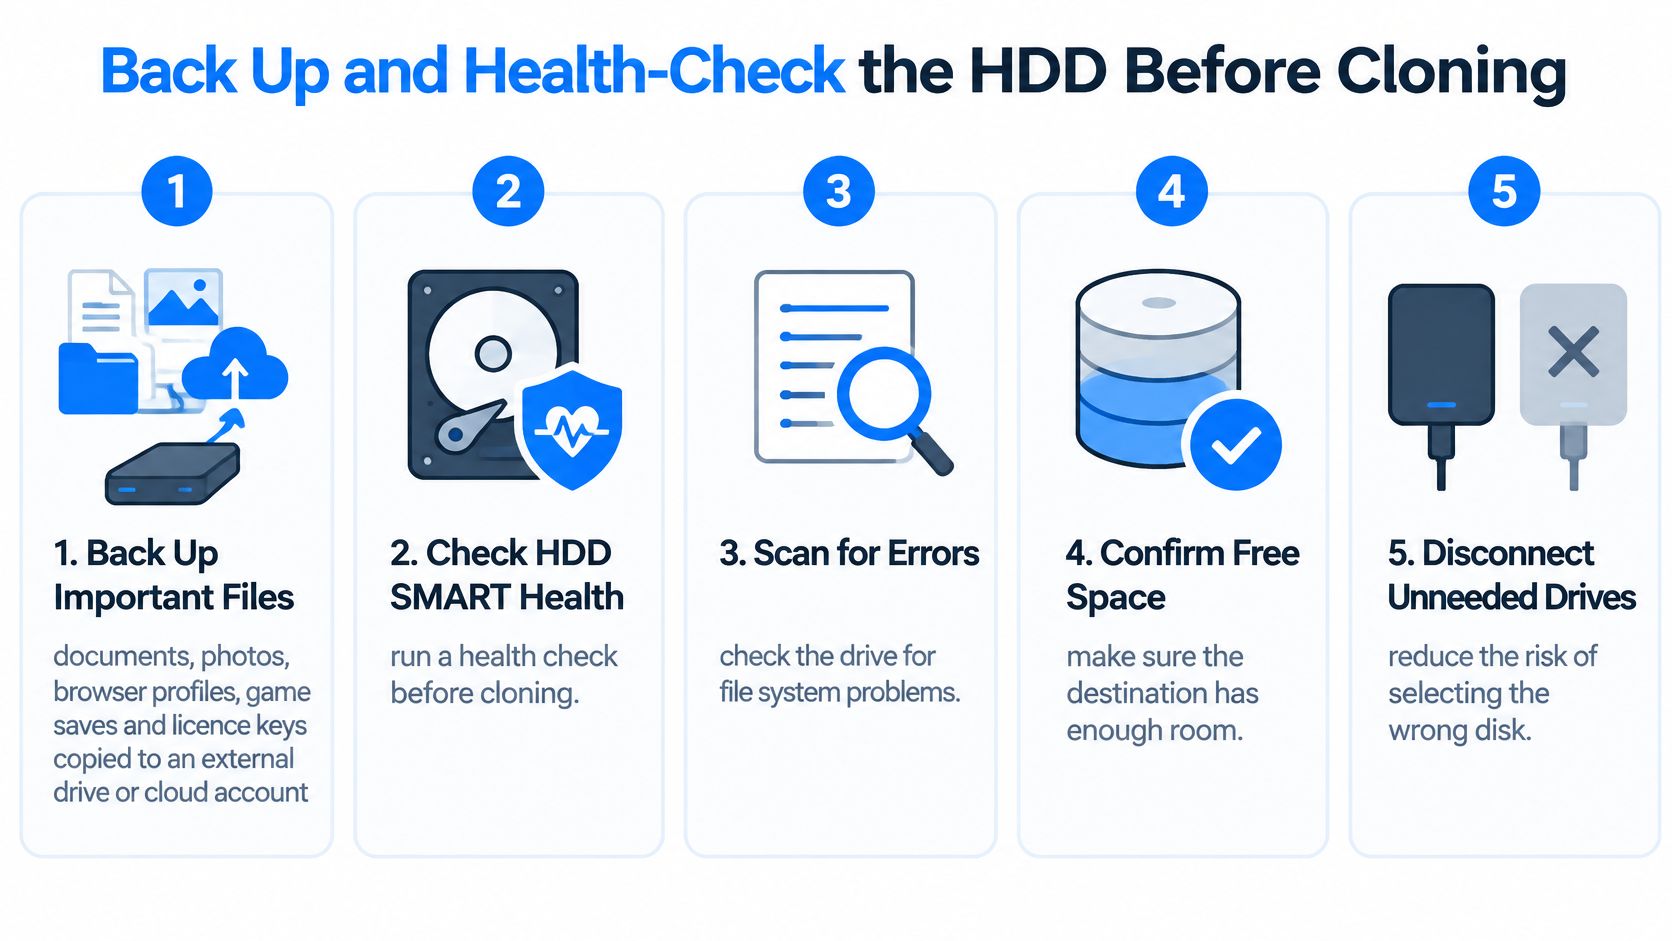
Work through these checks in order. A no at any early step is a no-go for cloning.
Copy the files that would hurt to lose. Put documents, photos, browser profiles, game saves and licence keys on an external drive or a cloud account you already use. Open a handful of those copies. A backup you have not opened is only a hope.
Read the drive's own health report. CrystalDiskInfo, or the SSD maker's tool once the new drive is fitted, shows SMART data. Note reallocated sectors, pending sectors, climbing error counts and high temperature. The warning signs of hard drive failure are the point where another clone attempt can make recovery harder.
Scan the filesystem, then measure space. Run a Windows error check so obvious directory problems surface before the copy. In Storage settings, compare used space with the SSD's usable capacity and leave headroom for updates.
Prepare the SSD, not just the cable. Update firmware with the manufacturer's tool and connect through a proper SATA port or M.2 NVMe slot. A loose USB adapter is a common reason a clone dies at 40%.
Get the recovery key off the drive. If device encryption is on under Privacy and security, save the BitLocker recovery key from your Microsoft account or the printed file, and store it somewhere that is not this PC.
Stop if the drive is already failing. Clicking, freezing or repeated read errors mean you should not keep power-cycling it. If Windows itself is the mess rather than the disk, it can be cleaner to choose a Windows repair path and copy user data afterwards.
Go or no-go: a clean SMART report, a backup you have opened, and an SSD with room to spare. Anything less, and the clone is the wrong next step.
How to Clone HDD to SSD Step by Step
A clone can finish successfully and still leave you with a disk that will not boot or files you cannot open. Treat the copy as one step in preserving your data, not proof that the migration is safe. The NCSC secure sanitisation guidance recommends checking drive metadata for remapped sectors and bad sectors. A drive showing either should not be your only source or destination.
Before you start, confirm the SSD has enough capacity for the data being copied, its firmware is current, and it is connected through a reliable SATA or NVMe connection. The cloning software must handle your partition layout and boot mode. Samsung Data Migration and the Acronis tools bundled with some drives do that from inside Windows, while Clonezilla, booted from a USB stick, also handles GPT and UEFI disks.
Run the copy without touching the old disk afterwards
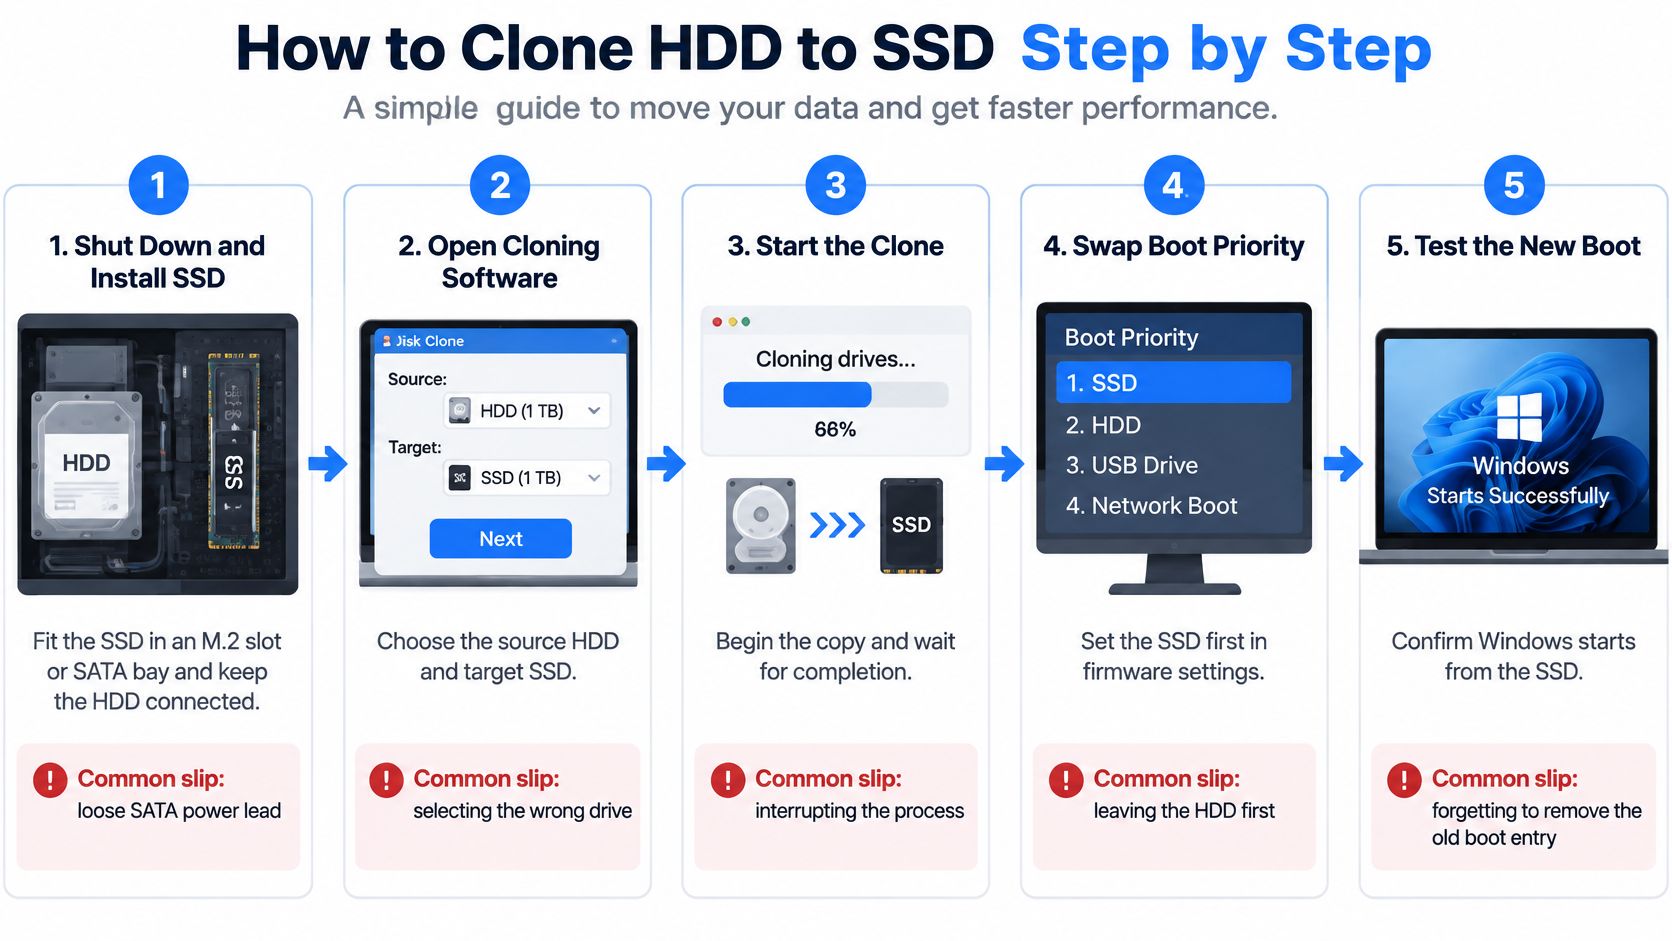
Fit the SSD and keep the HDD connected. Shut down, seat the SSD in an M.2 slot or SATA bay, and check the power and data connections. A SATA power plug can look connected while sitting loose.
Start the cloning program in the right environment. Open a Windows migration tool in Windows. To use Clonezilla, boot from its USB stick rather than trying to install it over the system you are copying.
Clone the whole disk. Choose the HDD as the source and SSD as the destination. A whole-disk clone includes the EFI and recovery partitions. Copying only the Windows partition can leave the PC unable to start.
Use SSD partition alignment. Select the option to align partitions for the SSD. Misalignment may not stop the clone, but can reduce performance.
Keep the copy uninterrupted. Connect the computer to mains power, pause downloads and updates, and prevent sleep until cloning finishes. A laptop that sleeps during the process can leave an incomplete destination.
Test the SSD on its own. Shut down and disconnect the HDD, or set the SSD first in the firmware boot order. Disconnecting the old drive removes ambiguity about which Windows installation started.
Check the result beyond the desktop. Confirm activation, applications, user profiles, BitLocker status and important documents. Seeing your wallpaper only proves that Windows reached the desktop.
Reconnect the HDD only after the SSD passes its checks. If the SSD has not booted cleanly, reconnecting the source can make it easy to start from the wrong disk or change the wrong copy.
This walkthrough shows the physical swap and boot check in order.
What a good first boot looks like
Run a cold boot, restart the computer, test sleep and wake, check the SSD's SMART status, and open important files. For files that must match exactly, compare hashes; otherwise, open the documents and folders you rely on. A progress bar reaching 100% is not a data check.
Keep the HDD unchanged until the SSD has passed these checks and you are satisfied with the data, licensing and boot behaviour. If the SSD is missing from the boot menu or Windows enters recovery, stop and diagnose before attempting another clone.
Fix Boot and Encryption Problems After the Clone
If the hard disk drive clicks, freezes or gets worse between attempts, stop reading it over and over. Image what is still readable and pull irreplaceable files before any full migration. A finished clone of a dying disk is not the same job as getting the files off it.
UK-focused SSD upgrade guidance notes that bad sectors can make a conventional clone fail, and that an encrypted Windows drive may need its password or encryption handled before you change hardware. Confirm the BitLocker recovery key before the next hardware change. I would rather lose an evening reinstalling apps than lose the only copy of a recovery key.
'Clone everything' is not always the safest aim. Critical files and a drive that is still readable matter more than a perfect copy of an old Windows install.
Symptom | Likely cause | Fix |
|---|---|---|
Black screen with flashing cursor | Boot mode and partition style do not match | Match UEFI with GPT, or legacy BIOS with MBR |
PC boots the HDD instead of the SSD | Boot order still lists the HDD first | Set the SSD first in UEFI boot order |
Clone fails at a set percentage | Bad sectors on the source HDD | Stop, back up readable files, then image with a recovery tool |
BitLocker recovery screen | Hardware change triggered recovery | Enter the 48-digit recovery key |
Windows says it is not activated | Hardware change on the device | Link the Microsoft account or run the activation troubleshooter |
Boot loop after the first restart | Boot files missing or incomplete | Run Startup Repair, or rebuild boot files with bcdboot |
Match the fault before you reinstall
A flashing cursor is usually firmware mode fighting the partition style. GPT belongs with UEFI, and MBR with legacy BIOS. The difference between UEFI and BIOS boot modes is the setting people change by accident when they are hunting for the new drive.
If the PC still starts the old disk, the SSD is probably fine and second in the list. A clone that dies at the same percentage is the source surface, not a software bug. Stop and switch to file recovery.
The BitLocker screen wants the 48-digit key, not your Windows password. An activation warning after a disk change is usually fixed by the troubleshooter once the Microsoft account that holds the licence is signed in.
When the boot files themselves are incomplete
For a boot that will not repair from the desktop, boot a Windows installation USB, run Startup Repair, then rebuild the boot files with if repair does not stick. A clean reinstall comes after the files you care about are somewhere else. Tidying the boot menu on a disk that still holds the only copy of the accounts is the wrong order.
Tune the New SSD for Speed and Lifespan
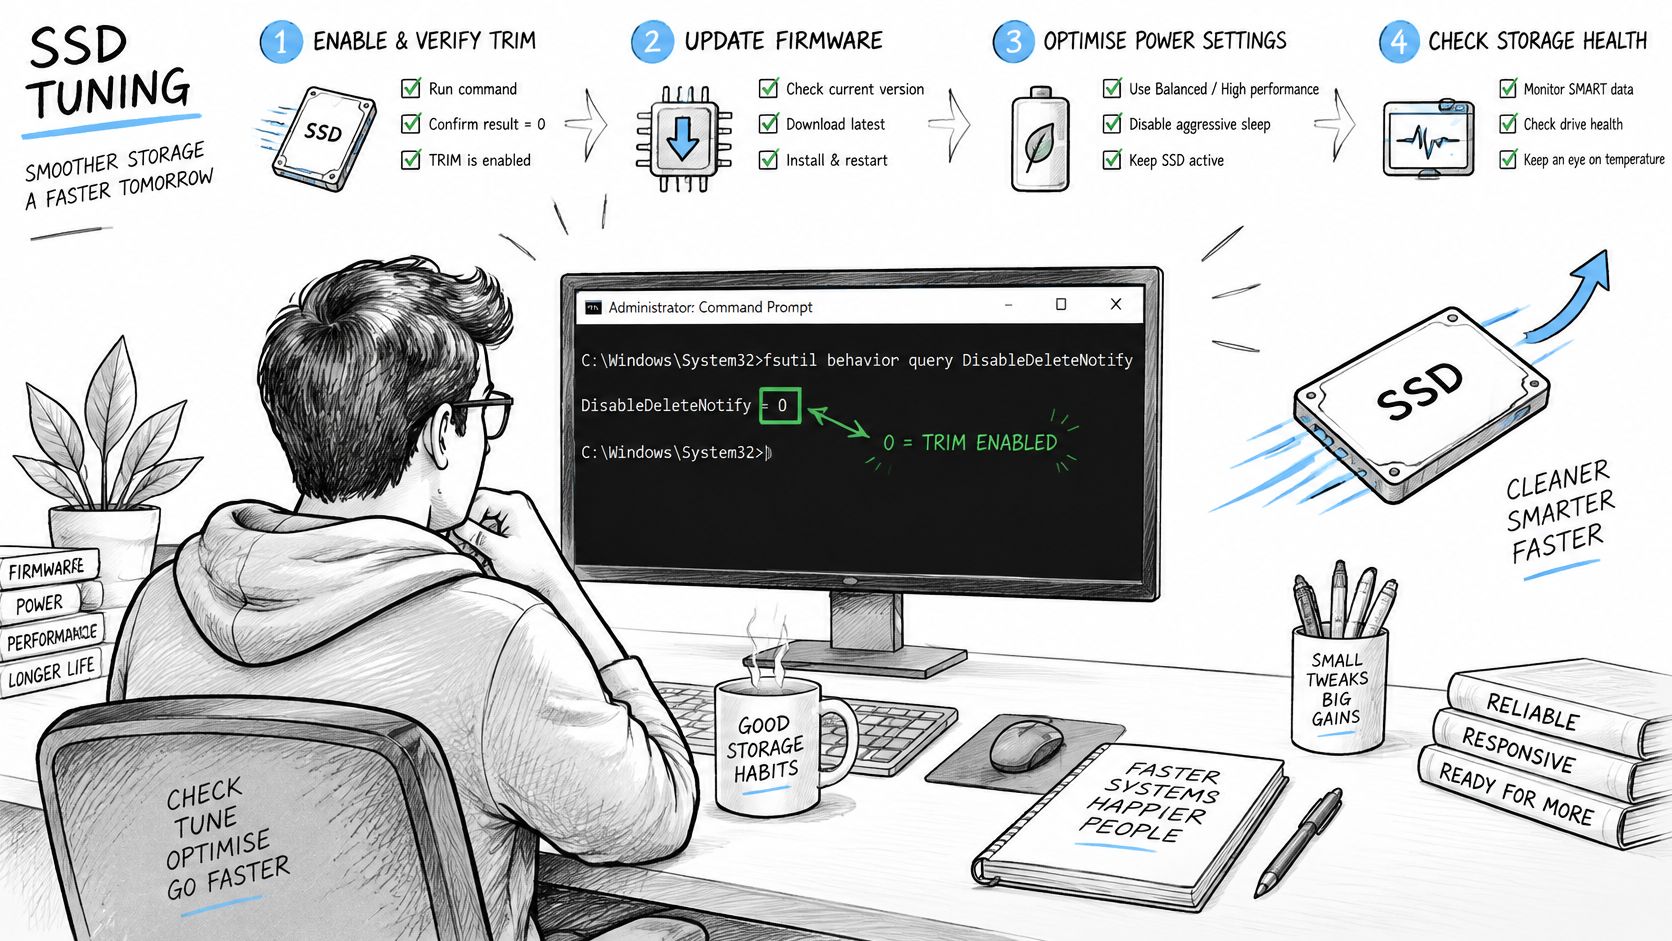
A successful boot does not mean the SSD is running in the mode it was sold for. These settings are small, and each one has a reason.
Confirm TRIM. In an administrator Command Prompt, run . A result of 0 means TRIM is on. TRIM tells the SSD which blocks are free, so write speed does not sag after months of ordinary use.
Optimise, do not defragment. In Defragment and Optimize Drives the disk should show as a solid state drive, with scheduled optimisation that issues TRIM. Defragmenting an SSD adds writes and does not line up files the way it does on a spinning disk.
Check the controller mode. In firmware, SATA SSDs should be in AHCI. NVMe drives use their own driver and do not want a legacy IDE setting left over from an old build.
Update the stack. Chipset and storage drivers, including Intel RST or the AMD equivalent, plus SSD firmware from the maker, fix odd stalls that look like a bad clone.
Turn off scheduled defragmentation if Windows has labelled the SSD as a hard disk. Extra writes, no speed gain.
Leave roughly 10 to 15 percent free. The controller uses that spare room to manage wear. Filling the drive to the last gigabyte is how a fast SSD starts to feel ordinary.
Benchmark once. Compare the result with the speed printed on the box or the product page. A SATA SSD stuck near hard-disk speeds usually means the wrong mode, a slow USB enclosure still in the path, or a PCIe lane running short.
If the numbers sit well below the rated figures after AHCI or NVMe is correct and the drive is in its proper slot, look at the cable, the enclosure and the firmware before you blame the clone. The practical gap between a hard disk and a solid state drive shows up in boot time and in opening large folders, which is what you should feel once the link is right. Our note on how much faster an SSD is than an HDD is the comparison to use when the benchmark looks suspiciously low.
Retire the Old HDD Safely or Keep It as a Backup
Cloning success is not the end of the job. The old disk still holds personal, customer, financial or health information, and a quick format does not prove that data is gone.
You have four honest choices. Keep the HDD unchanged and offline as a fallback for a short period. Reuse it as secondary storage only after a verified wipe and a health check. Sell or recycle it after sanitisation you can check. Destroy it if it held sensitive data and you cannot verify the wipe, or if the drive is failing.
NCSC data security guidance states that SSDs can be difficult to sanitise reliably and recommends considering destruction for sensitive data. It also advises manufacturer ATA or NVMe Sanitize functions where they fit, checking the whole user-accessible space afterwards, and treating remapped sectors or a failed check as a sign that data may remain. Environment Agency guidance on confidential HDDs and SSDs points to destruction standards such as BS EN 15713:2023, with controlled handling and the right waste permissions for shredding.
UK government bodies reported about 1,491 tonnes of ICT waste in 2023–2024, of which 34% was reused, 63% was recycled and 1.3% (about 20 tonnes) went to landfill, according to the Greening Government ICT annual report. Reuse is worthwhile. It is not a reason to hand someone a drive that still contains customer records.
A retirement sequence you can audit
Prove the new system first. It boots, and the files you named at the start open.
Write down the serial number and the decision: keep, wipe and reuse, recycle, or destroy.
Sanitise with a proper command. An HDD can take an ATA Secure Erase or a trusted full overwrite. For an SSD, use the maker's sanitise command or destroy the encryption key. Plain overwriting is a poor match for flash.
Verify the user-accessible space, not just the progress bar in a free eraser.
If you cannot verify it, do not reuse it. A failing drive belongs in destruction, not in a desk drawer "just in case" and not on a marketplace listing.
A signed note that separates "Windows boots from the SSD" from "the old disk was sanitised or destroyed" is what a small business actually needs if a customer later asks where their records went.
We follow strict protocols to keep customer data safe and confidential during repairs, and we specialise in recovery from damaged or corrupted hard drives. If you ask for it, we also perform a complete data wipe during a repair. Keep the old drive offline until the new system has run for about a week, then wipe or destroy it. If the migration stalled, or the disk holds files that will not copy, bring it in rather than retrying the clone until the drive stops talking.
Steel City IT in Sheffield carries out SSD upgrades with data migration for home PCs and small-business machines, and we can recover files from a drive that is no longer safe to clone. If you want the old disk wiped as part of the same visit, ask for that when you book. Visit Steel City IT to arrange an upgrade, a recovery, or a secure wipe.