
How to Upgrade Graphics Card: A Safe Step-by-Step Guide

UK consumers spent £723 million on PC hardware in 2025, a rise of 12% year on year, according to the UK Games Market Valuation 2025. That growth outpaced the wider games market, yet it doesn't mean every PC should get the fastest card you can afford. A graphics upgrade fails most often on power, connectors and clearance, not on the PCIe slot itself.
If you're learning how to upgrade graphics card hardware safely, treat it as an electrical and physical fit problem first. Check the power supply, measure the case, confirm the cables, then shortlist models. I would rather fit a lower tier card that runs within the system than force in a flagship that needs a new PSU, more cooling and still leaves you CPU limited.
Table of Contents
Check Compatibility Before You Buy
A PSU wattage recommendation is a starting point, not a guarantee. The UK graphics card guide from IT Blog Pros lists NVIDIA system recommendations of 550 W for an RTX 5060, 650 W for an RTX 5070, 750 W for an RTX 5070 Ti and 850 W for an RTX 5080. AMD recommendations are 450 W for an RX 9060 XT and 750 W for an RX 9070 XT. These figures depend on the test system, so a matching number on an old or poor-quality PSU does not prove it can run the card reliably.
GPU tier | Example card | Recommended PSU |
|---|---|---|
Entry level | RTX 5060 | 550 W |
Entry level | RX 9060 XT | 450 W |
Upper mid-range | RTX 5070 | 650 W |
Upper mid-range | RTX 5070 Ti | 750 W |
High-end | RX 9070 XT | 750 W |
High-end | RTX 5080 | 850 W |
Flagship | RTX 5090 | 1000 W |
The RTX 5090 also needs the correct 16-pin power connection, rated for up to 600 W. Some other RTX 50-series cards can use an adapter, provided every required 8-pin PCIe connection is fitted. A missing native lead or an adapter without all its connections is a practical compatibility failure, even when the PSU's wattage looks sufficient.
Measure the Power Supply You Actually Own
Photograph the PSU label, case interior and available PCIe cables before ordering. Record the exact PSU model, age, modular design and rated continuous output. A large peak figure on the casing is not a substitute for its continuous rating. Note your CPU and current graphics card too: a powerful GPU paired with a weak processor or a 1080p monitor may not be a good use of your budget.
Connector type matters alongside wattage. PCMag UK's budget graphics card guide notes that budget cards commonly use six- or eight-pin connectors, while newer NVIDIA models may use a 12VHPWR connector or adapter. Count the free PCIe connections and check whether the required leads came with your PSU. Never use a modular cable from a different PSU brand. Pinouts vary, and the wrong cable can damage hardware.
Practical rule: If you cannot identify the PSU model, its age and its available PCIe connectors, wait before buying a card.
Use a worked example to estimate headroom. A hypothetical system with a 300 W GPU, 150 W CPU and about 100 W for drives, fans and USB devices draws 550 W on those figures. Allowing roughly 20 to 30% headroom points to a PSU rated around 660 to 715 W. A 650 W unit is marginal; a good 750 W unit is a more comfortable match. Replace a generic, damaged or very old PSU rather than relying on its label, especially if it whines, smells hot or has caused reboots.
Short power spikes can trip an ageing PSU even when average gaming draw appears acceptable. That can produce black screens, driver resets or random restarts that resemble a faulty graphics card.
Measure the Case Separately
Physical fit and electrical fit are separate checks. Measure card length against any front radiator or drive cage, count the expansion slots the cooler will occupy, and allow room for the power plug to bend without pressing against the side panel. A thick cooler may also block a neighbouring slot or sit so close to a glass panel that airflow suffers.
Compare your measurements with the card manufacturer's published dimensions and power specifications. A triple-fan card may be too long or thick for a case designed around a short dual-fan model. Check the motherboard layout too, including clearance around the primary PCIe slot, chipset heatsink and M.2 cover.
The cheapest safe upgrade may be a lower-tier card that works with your existing PSU and case. That avoids replacing two major components and can better suit your monitor. For the MSI GeForce RTX 3080 Gaming Z Trio, check that the case has room for a large triple-fan card and that the PSU has sufficient capacity and the right 8-pin PCIe connectors. You can message Steel City IT to have your PC checked for fit with that card. Shortlist any card against four measurements: PSU watts, connector count, card length and slot thickness. If it fails one, choose another model.
Small Form-Factor PCs and Laptops
Small cases punish guesswork. A card can match the length specification yet still fail because its cooler is too thick, its power socket faces the panel, or its fans sit millimetres from a perforated wall. Some compact chassis need half-height or low-profile cards, which limits you to lower power models.
Check the PSU format before you shop. An SFX power supply limits available wattage and connector choices compared with a full ATX unit, and cable length can be a problem in either direction. Too short won't reach, and too long fills the only airflow path.
Heat decides whether a technically possible fit is usable. Blower style and front to back coolers behave differently in a tight enclosure, and either can run hot if intake air is restricted. Test with the panels fitted and watch temperatures, fan noise and clock behaviour, not just whether Windows loads.
Many pre-built desktops add another trap. Proprietary PSUs, unusual motherboard connectors and fixed drive cages can mean an off-the-shelf card needs a different supply or a custom cable. If the manufacturer used a non-standard 12 V layout, stop and price the whole conversion carefully.
Laptops are simpler, and not in a helpful way. Most laptop GPUs are soldered to the board and cannot be swapped. Your realistic options are a new machine or an external GPU enclosure over Thunderbolt or USB4, which gives desktop class graphics with a performance cost from the interface bottleneck. Where the laptop allows it, RAM or storage upgrades are cheaper alternatives, but they won't turn weak integrated graphics into a gaming GPU.
How to Swap the Card Step by Step
Write the sequence down before you open the case, then work through it without skipping the boring parts. The visual summary below matches the order I would use for a first upgrade.
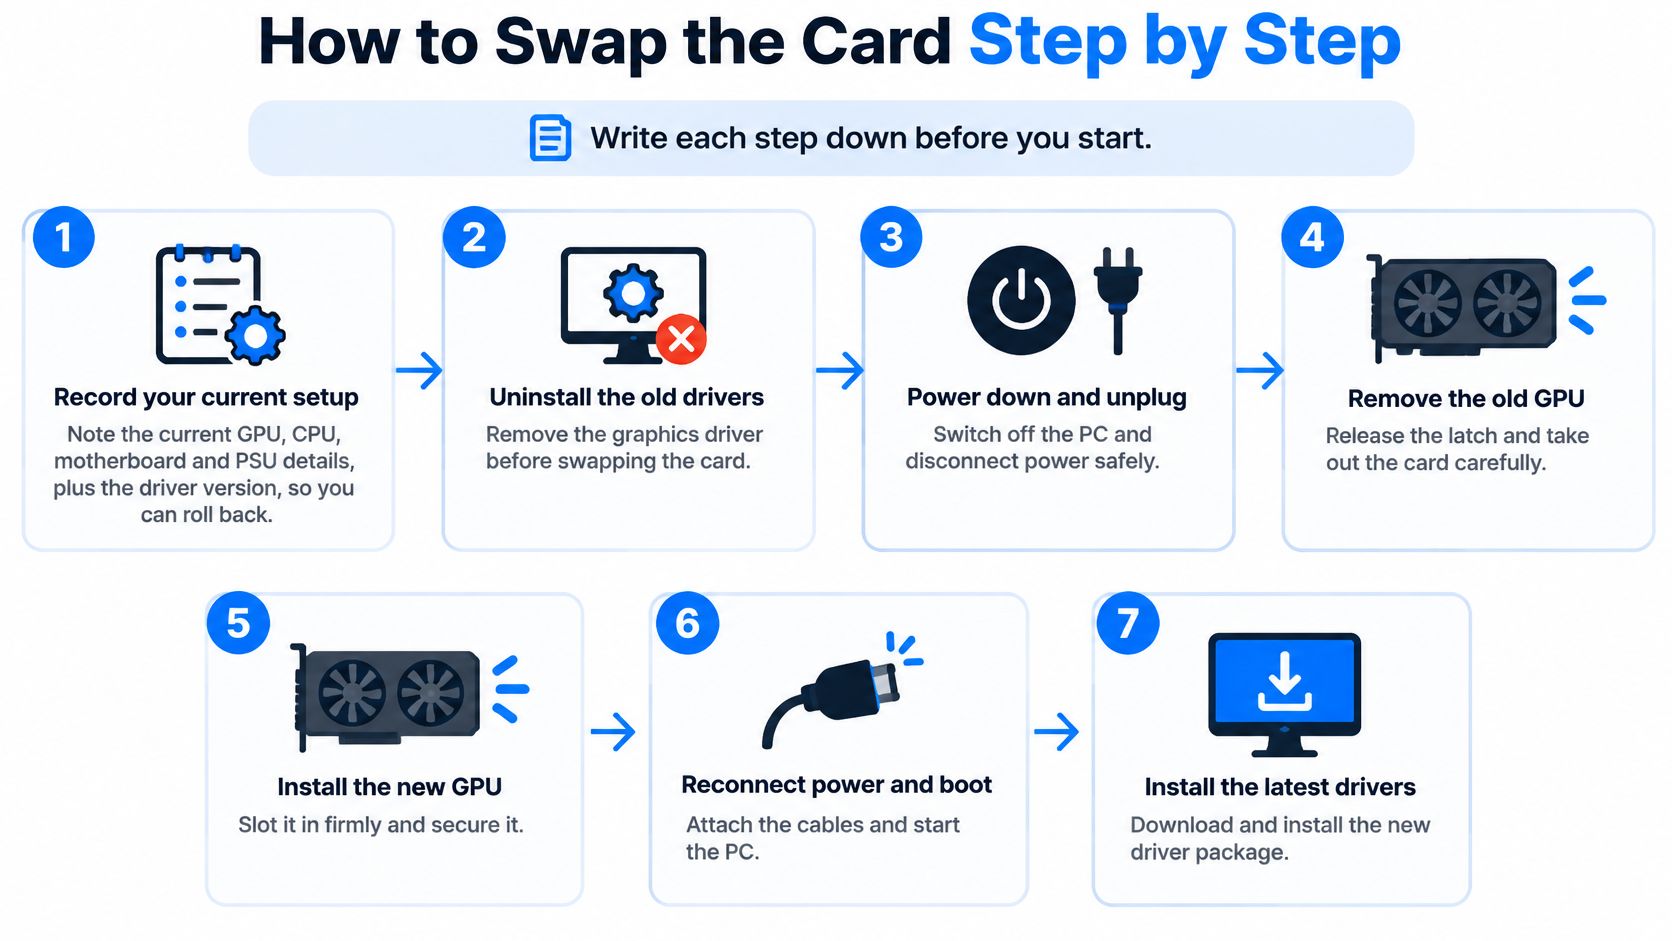
Record the current setup: Note the GPU, CPU, motherboard, PSU and driver version, so you can roll back or search for the right package. Take a photo of cable routing too.
Uninstall the old driver: Use the vendor clean install option or a trusted removal tool before shutdown. Leftover files are a common cause of driver resets after a swap, especially when changing from AMD to NVIDIA or the reverse.
Isolate the power: Shut down, switch off at the wall, unplug the 230 V supply and hold the power button for about ten seconds to drain residual charge. The HSE guidance on working with electrical equipment says all energy sources must be isolated before work begins and equipment must be suitable for its intended task.
Ground yourself: Touch bare metal on the case before handling the card, and keep doing it if you walk away and return. Handle the card by its bracket or cooler edges, not the gold contacts.
Remove the old card: Take off the side panel, remove bracket screws, unplug PCIe power leads, then release the PCIe latch at the rear of the slot. Lift straight out with even pressure. Forcing one end up can crack the slot or the card edge.
Seat the new card: Align it with the primary PCIe x16 slot, press firmly until the latch clicks, then fit the bracket screw. A heavy card that isn't screwed down can sag and lose contact.
Connect every power lead: Push each connector home until it clicks or sits flush, including every input on an adapter. Incomplete power and poor seating cause more failures than the slot itself, and a half seated high power connector can overheat.
Tidy and close: Route cables clear of fans, check nothing presses on the card, and refit the side panel before the first proper test. An open case hides airflow and cable clearance problems.
The short video below is useful for seeing hand positions for the latch and bracket, which are awkward to judge from text alone.
Move the monitor cable to a port on the new card before you boot. Leaving it in the motherboard output keeps the display on integrated graphics and makes a working upgrade look dead. If the fans spin but there's no picture, check that cable first, then seating and power, before you assume the card is faulty.
Drivers, BIOS Settings and Stress Testing
Download the current NVIDIA or AMD driver from the vendor site, not from a driver updater bundle. Run a clean install, reboot, then confirm the card appears correctly in Device Manager and in the NVIDIA App or AMD Software. Check your refresh rate in Windows display settings too, because a new driver can leave a high refresh monitor sitting at a basic setting.
Check the Firmware Settings That Matter
Enter BIOS or UEFI and confirm the primary display is set to the PCIe slot rather than integrated graphics. Check that the PCIe link runs at the generation your motherboard and card support, and enable Resizable BAR or Above 4G Decoding where the board supports it. These settings don't rescue a weak PSU, but the wrong display priority can send video to the wrong output.
Update the BIOS only for a reason. Do it if the card isn't detected or the motherboard release notes list a fix for newer GPUs, and don't flash firmware on a system that reboots under load. A failed update can turn a graphics problem into a motherboard problem.
Don't chase the newest BIOS just because the card is new. Change firmware when the symptoms or release notes point to it.
Prove Stability Before You Call It Done
Run one repeatable game benchmark at your usual resolution and settings, and record the average frame rate. Then follow a structured guide on how to stress test a GPU for 20 to 30 minutes while logging temperatures, clock speed, power draw and error events. Use the same workload each time, or the numbers won't tell you anything useful later.
Your pass criteria are straightforward. The card is detected correctly, clocks stay steady, fans respond normally, and there are no visual artefacts, freezes or reboots. Temperatures should level off rather than climbing until the card throttles.
Repeat the test with the side panel closed and cables in their final position. Restricted airflow can invalidate an open case result within minutes. Save the benchmark score, driver version and peak temperature in a note, because that baseline makes future faults much easier to judge.
Fixing Black Screens, Crashes and Artefacts
Work from the cheapest check downwards. Most post-upgrade faults come from seating, power or drivers, and those take minutes to test. A clean driver reinstall takes longer, while a PSU swap or component repair can take days, so don't start with the expensive conclusion.
Symptom | Likely cause | First fix |
|---|---|---|
Black screen at boot | Loose power lead or unseated card | Reseat the card and check every PCIe power lead |
Random reboots under load | Underrated or ageing PSU | Test with a known-good PSU or replace the unit |
Driver resets or game crashes | Leftover old driver or conflict | Clean reinstall using the vendor clean-install option |
Visual artefacts or flickering | Unstable overclock or overheating | Reset to stock clocks and check fans and airflow |
Card not detected | Slot, BIOS display setting or seating | Check the primary PCIe x16 slot and BIOS display settings |
Burning smell or melted connector | Overload or wrong cable | Power off at once and replace the cable and check the PSU |
Use substitution to separate card faults from system faults. If your old card runs cleanly in the same slot with the same cables, suspect the new card or its power demand. If the new card shows artefacts in a second PC at stock clocks, the evidence points strongly at the GPU.
Keep the order fixed: reseat and inspect leads, clean the driver, verify BIOS display settings, test with a known good PSU, then consider repair or return. Stop at once for a burning smell, a hot connector or visible melting. Those aren't troubleshooting puzzles, they're a reason to power off and book a diagnostic.
Decide Whether to Upgrade, Repair or Recycle
The card price is only part of the cost. Power draw matters too: one UK energy scenario in the Gera Home gaming PC running cost estimate, based on an Ofgem price cap rate of 26.11p/kWh, estimates that a 675 W high-end gaming PC used four hours daily costs about £21.38 per month, compared with about £2.77 per month for a 245 W system used two hours per session, five days a week. These are scenario estimates, not a prediction of your bill, but they show why a higher-tier card can cost more to run.
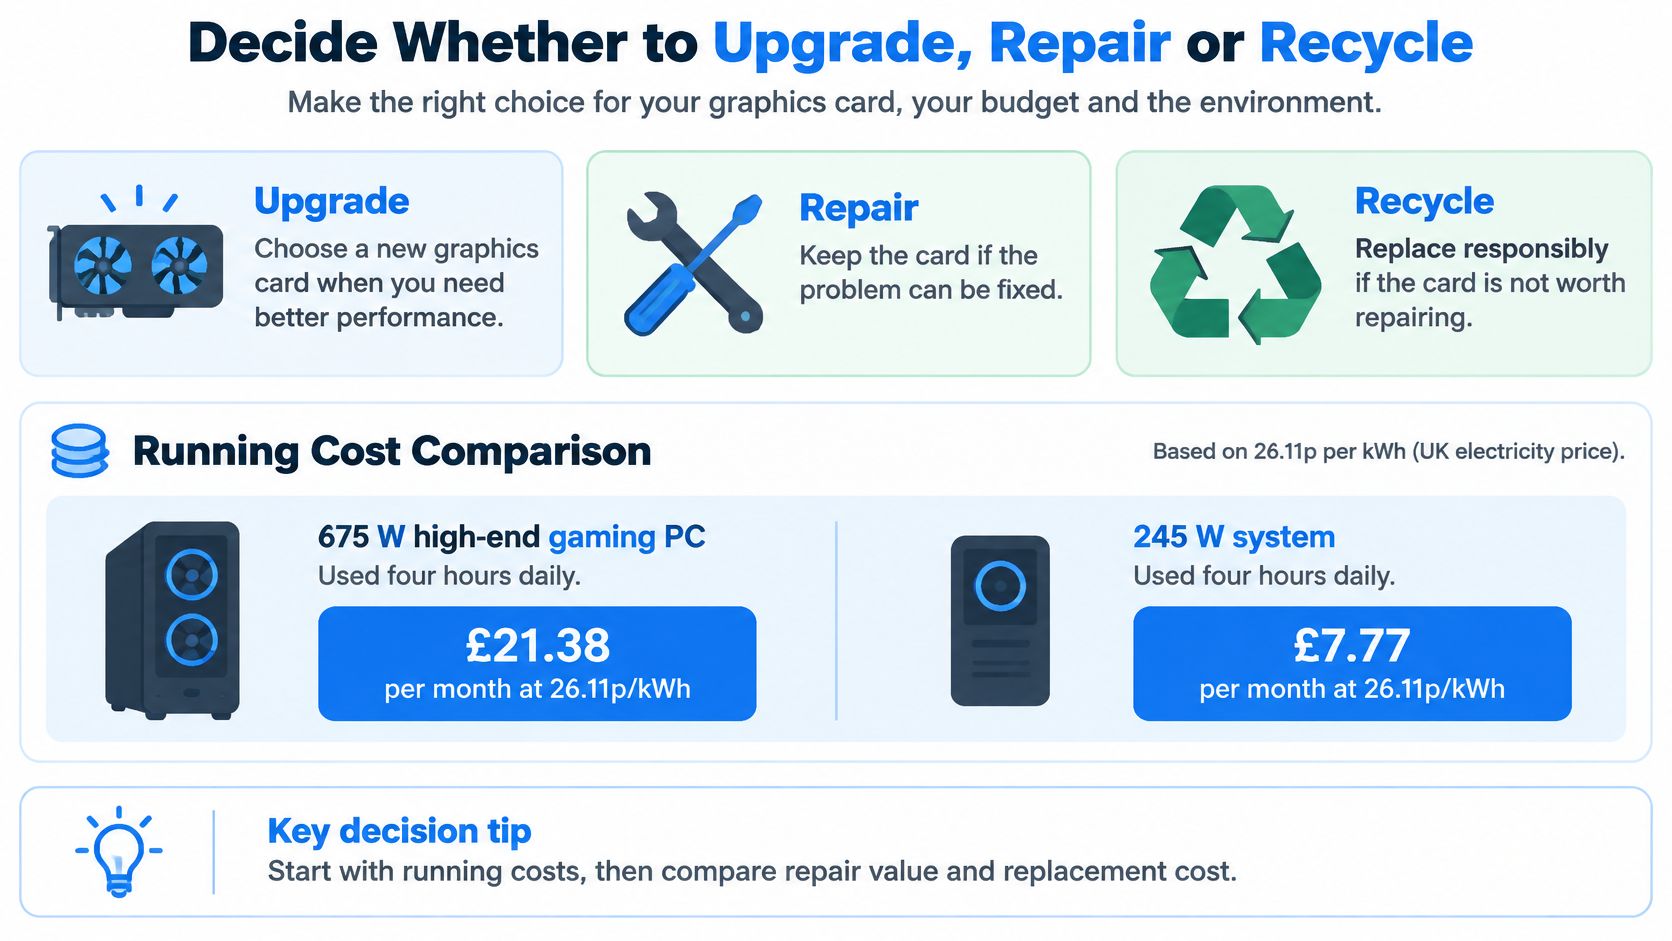
Upgrade when the graphics card is limiting performance and the rest of the PC can support its power and physical requirements. A lower-tier card may be the cheaper safe choice. Consider repair if the fault may involve the VRAM, power delivery or solder joints, and the card still suits your monitor. Steel City IT offers Graphics Card (GPU) Repair and VRAM Fixes, so replacement is not the only option when a card develops a fault.
Decide what to do with the old card before putting it aside. Sell it with any faults clearly disclosed, keep a working card as a diagnostic spare, or take a dead card to a WEEE-compliant collection or recycling route rather than putting it in household waste. The guide to deciding whether a device is beyond economical repair can help you weigh repair against replacement.
If you are considering the MSI GeForce RTX 3080, message Steel City IT to have your PC checked for fit before buying. A targeted repair or modest upgrade can make more sense than replacing a sound system, but only if the card fits the case and the PSU can support it.
If the measurements do not add up, or your PC will not detect the new card, Steel City IT in Frecheville offers diagnostics, component upgrades, GPU repair and custom PC builds. Send the PSU model, case and monitor resolution when you message, so the fit and power requirements can be checked before you spend money on the wrong tier.